
I have had many discussions with people about turning centers in their granny squares when crocheting in the round and what they can do about it. A friend of mine asked me if I could write up my explanation and advice because she kept forgetting. So here goes!

What is a turning center granny square?
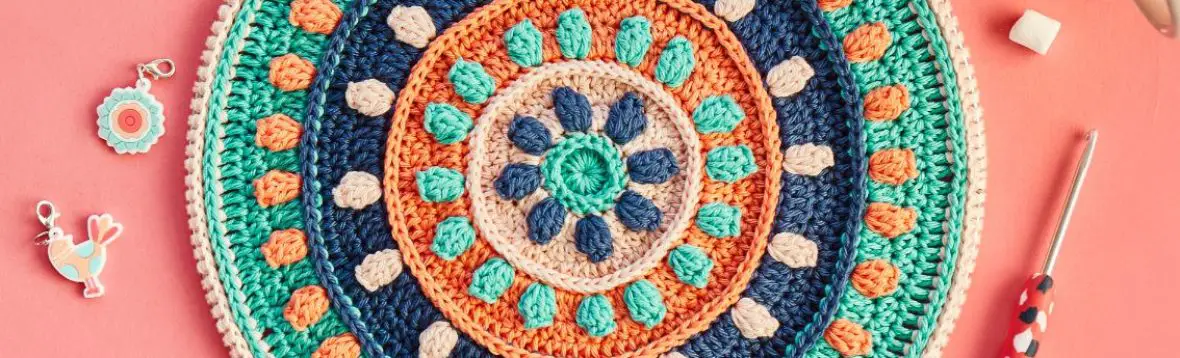
Before we look at what the cause is and how to prevent your center turning, lets first take a look at a turning center. If you look at this large square afghan worked in the round, this is up to part 21 of the Dutch CAL 2015, you will see that the center turns to the left relative to the outer corners. As you get closer to the center, the turn becomes more pronounced. This turn is to the left because I’m right-handed and work from right to left. If you are left-handed your turn will be in the opposite direction, i.e. to the right.

You might think it strange that my work turns, after all I am a semi-experienced crocheter. There is a myth that turning centers only happen to novice crocheters. Nope. Not true. It happens to the best of us.
What causes your center to turn?
To understand why a center turns, we have to look at the way crochet stitches are worked into one another. When working a round of stitches into the stitches below, the new stitches are positioned ever so slightly to the right of the stitches directly below them.
To show you what I mean, take a look at the image below. I have drawn a line through the center of the stitch in round 1. The post of the same stitch in round 3 is not aligned with the post of the stitch in round 1, but offset by a millimeter or so. As such this is not much, but when making large squares these millimeters build up as the square grows and at a certain point any given stitch is no longer above the equivalent stitch a few rounds down.
If you are right-handed your stitches are offset to the right, so your square turns to the left. If you are left-handed your stitches are offset to the left and your square turns to the right.

How to prevent your center from turning?
This turn is very frustrating and can really be a bummer on your beautiful work. So what to do about it?
Blocking
The first thing you can do is block, block, BLOCK your work. If you have noticed that your work tends to turn a lot, be sure to block your work at regular intervals whilst making your project. If you wet-block and keep your corners pinned down at square angles you can straighten out the turn before it becomes prominent. This requires patience and perseverance; I know from experience that the last thing I want to do during a project is stop my work to block.
To illustrate the effect of blocking I show you a comparison between the Dutch CAL up to part 21 after serious blocking. The turn is not completely gone, but it is considerably reduced. To un-turn a square by blocking you need to wet-block, just spraying your square is most probably not enough, and use a lot of pins to really force the square back into shape.

Skipping the first stitch
A second thing you can do is change the way the stitches are worked. Do not attempt this if you are new to crochet because it’s easy to cause mistakes and get your stitch count all messed up. The trick to correct the problem is to skip the first stitch after the corner which will cause your work to pull back to the right. But now you have one stitch less than you need, so the best thing is to add an extra stitch in your corner.
An example to illustrate
Assume the pattern says
(2dc, ch2, 2dc) in the ch2-corner space, 1dc in next 7 st.
To correct, adapt the pattern as follows:
(3dc, ch2, 2dc) in the ch2-corner space, skip the first st., 1dc in next 6 st.

The effect of this adaptation only becomes visible when you work a new round because then the posts of the new stitches are aligned with the stitches two rounds down. If you look at the comparison below the square on the left has been worked in the ‘normal’ way and the square on the right has been corrected by skipping the first stitch after the corner in round 3. The result is that the stitches in round 4 (the blue round) are realigned with the stitches in round 1.

Flipping your work
To get the same effect as the skipping the first stitch correction option above, you can also flip your work to work a round with the back of your work facing. This way the stitches are worked in the opposite direction and you again align your stitches. Personally I don’t like this option because in most designs the front of your work contains all the pretty details and if you work a row ‘the wrong way’, you lose some of that detail.
Corrected designs
A forth option is to look for designs which already incorporate the skipping stitch correction. Two examples are Sophie’s Universe by Dedri Uys and Around the Bases by ChiChi Allen. Both these designs tweak the square back every few rounds by skipping the first stitch immediately after the corner. This way the designers correct for that inevitable center turn and prevent it from happening in the first place.

I hope this helps you a bit to understand what the underlying cause of a turning granny square center is. At the end of the day it’s just a natural crochet phenomenon.
#itsallinanutshell
If you are making something with one of my patterns or one of my videos, I would love to see your work. Use the hashtag #itsallinanutshell on Instagram to help me find it, share your work in my It’s all in a Nutshell Crochet Nuts group on Facebook or tag me in one of your posts.
With love,
Esther
Follow me on
Facebook, YouTube, Ravelry, Instagram
This post contains affiliate links. Please read my disclosure and copyright policy. All opinions are my own and I only link to products I use or would use. Thank you for using the links on my blog and supporting my work.
Copyright (c) 2014-2024 It’s all in a Nutshell Creations. All rights reserved.
That is very interesting. How often would you miss the stitch at the beginning? I had found another way to do the same thing but a bit more radical in that involves changing direction every round. It does work though for the same reason as yours.
yes, turning your work and working the other way is also a perfect solution. I prefer not to do that because then the front side can become less beautiful. I would suggest skipping the first stitch every 5 to 8 rounds.
Thank you! next time I try a large granny square I will try it. I know what you mean about changing direction, it does change the surface texture that is why I was interested in your approach.
This is great! Question: why not skipping the first stitch every 2 rounds?
Because that is too much to my experience. Then it can turn the other way
Dear Esther, you didn’t mention one, in my opinion absolutely best way of making sure your squares don’t turn – you just turn your work after each row. So: row 1 – right side, row 2 – wrong side, row 3 – right side etc. In well developed designs like Sophies Universe with lots of colour work you can’t and don’t need to do that but in simple granny squares it’s essential in my opinion. And then the squares never turn.
Yes, this is an option, but I don’t like it because then the front side can become less beautiful.
and in this case it was better to work on the front side because all the special stitches,
Thank you sincerely learned a lot . I thought I was not accurate enough and so it happens and I was frustrated .
Hartelijk dank voor de uitleg. Dit is de reden waarom ik de CAL 2015 niet heb afgemaakt. Het scheve centre irriteerde mij mateloos en op vragen door mij gesteld kreeg ik zeer vage antwoorden (zou aan mij liggen).
Nogmaals bedankt!
Thanks for the expaination, i also made this one and mine has only turned a small bit. But I have another problem with my around the bases cal. I used a centerblock made from 12 granny squares, in the beginning everything was nice and flat, but now the centerblock is completely stretched out.
regarding the stretching you can best ask the designer, I only cover turning here 😉
I feel so much smarter now…I’m going to write this technique down in my crochet book! Thanks so much! I always wondered while making my Sophie why sometimes we were told to skip a stitch..now I know!
This may be a silly question but if one was able to crochet both left and right handed would doing every other row that way keep it from turning? I’ve thought about this in other patterns too where I wanted to see what it look like if the whole thing was done on the RS only. I would have to train myself to crochet left handed without being so clumsy. I think it could come in handy.
This actually sounds very plausible. I hadn’t thought of crocheting right and lefthanded. I think in theory you are right, but I have no idea if it works in practise.
Wow! Thanks for the information. I could see that happening but didn’t know why, or how to correct it.
Oh my. I did the ATB CAL and it never occurred to me that that was the reason the instructions skipped the 1st stitch! Alas, my afghan turned out pretty straight! Thank you for the explanation!
I notice the 2nd row is crocheted into the space just to the right of the post. Is this what is causing the work to pull to the right? I always take my 2nd row stitch into the post of the 1st row simply because I like my posts to be directly on top of each other for a neater look. (Really don’t like the ‘staggered’ look that results when crocheting into the space. Have done this for quite some time with good results.
No, the problem is that the 3rd stitch of row 2 is to the left of the first stitch in row 1.
Wonderful that you have found a way that works well for you 🙂
Thanks for this! I always just turn the granny square to keep it square, but this option is also good to know. I just have one question: Are you recommending we do this for every corner of the granny square?
No, not every corner because then you will overcorrect. I think about every 5 rounds or so should work well.
Esther! This is a GREAT blog post! I have just finished a new design and couldn’t understand why the squares are twisting. You did great job explaining everything! Thank you 🙂
Thankx Tatsiana. 😀
I must read this but was guided by a blogger whose name sadly escapes me at the moment to turn the work and this works for me. I haven’t noticed anything untoward with the looks of it either. I wondered if it was anything to do with a Physics solution that you do to one side what you do to another (can’t remember the actual terminoligy, is it action and reaction?) Long time since I left school!
Hi,
Thank you so much for the help above.
It has been baffling me for about a year now.
What am I doing to cause this slant? Plenty of other peoples are fine and ot doesn’t happen to everyone so why? Is it to do with the way I hold the crochet?
Many thanks – Karen B
Hi Karen,
As such the turning hapens to everyone, but some people have it more pronounced and then it is harder to correct with blocking. Personal tension will influence the turn. The best remedy is prevention ?
Nice written explanation.
I was on one of my crochet face look groups this morning and there was a huge discussion about turning or not turning your granny square. I have never turned them, I have always just continuously gone around and other people say they have always flipped it around at the next row. Above you said you never turn because the patterns did should be on the front. Who’s granny squares I have done have just been doing plain double crochet or half double crochet all the way around. Someone on that website said that you had an article about turning the granny squares, but I could not find it.
you are talking about flipping the granny square. the article above is about rotation of the centre. the word ‘turning’ can mean both. I am talking about turining in the sence of rotation of the centre around a centre point and how to prevent that.
Thank you so much for this explanation! You are the only one who explains this problem and the solution so clearly. I have a question… Shouldn’t I add thee Xtra DC after the chain in the corner so that the stitch I skip is made up for the next round? So instead of 3dc ch2 2dc skip first stitch and then chain 6. It would be 2dc ch2 3dc then skip a stitch? That way I have the correct number of stitches on that side for the next round? Sorry if this is a dumb question. I just don’t understand how to have the correct count for the next round.
Thank you so much for your time and for sharing your talents. I’ve learned so much from your videos!
if the project is already finished is it possible to wet block the turn out?
You can sure try, but dependent on how severe the turn is, it may or may not work.
Beste Esther,
Je opmerking over de steken die een beetje over elkaar heen kwamen te liggen klopt. Uit de reacties blijkt dat er meerdere haaksters zijn die 1 losse tussen de ( meestal 3) stokjes haken en 2 in de hoeken. Als je 2 lossen tussen de groepjes stokjes haakt en 3 lossen in de hoeken komt er meer ruimte voor de groepjes stokjes ( ze kunnen nu immers naast elkaar) en is het probleem opgelost . Ook hoeft het werk niet meer gekeerd en er hoeft niet meer nagedacht over een steek bijmaken/ overslaan.
Veel haakplezier!
Groetjes Loes