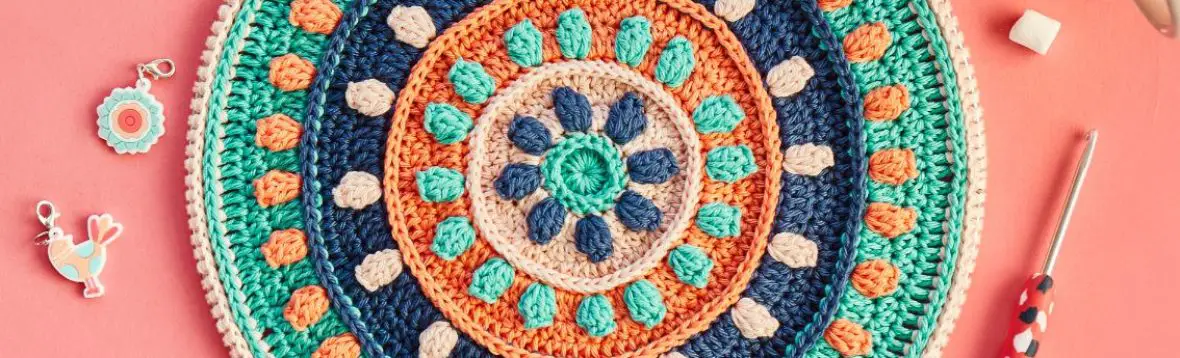
In this post you find the free pattern for my Snowflake Blanket. This blanket has the look and feel of a quilt, and is made using Scheepjes Cotton 8 and Sunkissed yarn. The pattern is made from solid and split granny squares, joined using a join-as-you-go method.
Resources
- Add Snowflake Blanket to your Ravelry Library
- Printable PDF available for a small fee on Ravelry and MY SHOP
- Share your work on my Facebook page or Instagram using #itsallinanutshell
Materials
- 29 x Scheepjes Cotton 8 (100% Cotton; 170m/50g) – White (502)
- 11 x Scheepjes Sunkissed (100% Cotton; 170m/50g) – Dark Blue (06)
- 3 x Scheepjes Sunkissed (100% Cotton; 170m/50g) – Light Blue (04)
- 3mm crochet hook
Scheepjes Cotton 8 and Sunkissed is available from Wool Warehouse (UK/International), Love Crafts (US/UK) and Caro’s Atelier (NL/EU) to name but a few Scheepjes stockists.
Size
The final blanket is approximately 145cm wide and 215cm long.
Gauge
Each square is approximately 9cm, before joining. After joining, the squares are approximately 8.5cm. The join-as-you-go method makes the squares slightly smaller because the edges are folded.
Suggestions to change size of blanket
If you want to make the blanket smaller, you could consider making only 4 rounds on the granny squares, instead of 5. The size of a square before joining will then be 7cm, and after joining 6.5cm. The estimated size for the blanket with only 4 rounds on each square is 110cm x 160cm.
Abbreviations
This pattern uses US Crochet Terms
ch chain
ch1-sp chain 1 space(s): number denotes number of chains in chain space
dc double crochet
sc single crochet
sp(s) space(s)
ss slip stitch
st(s) stitch(es)
RS right side
WS wrong side
YO yarn over
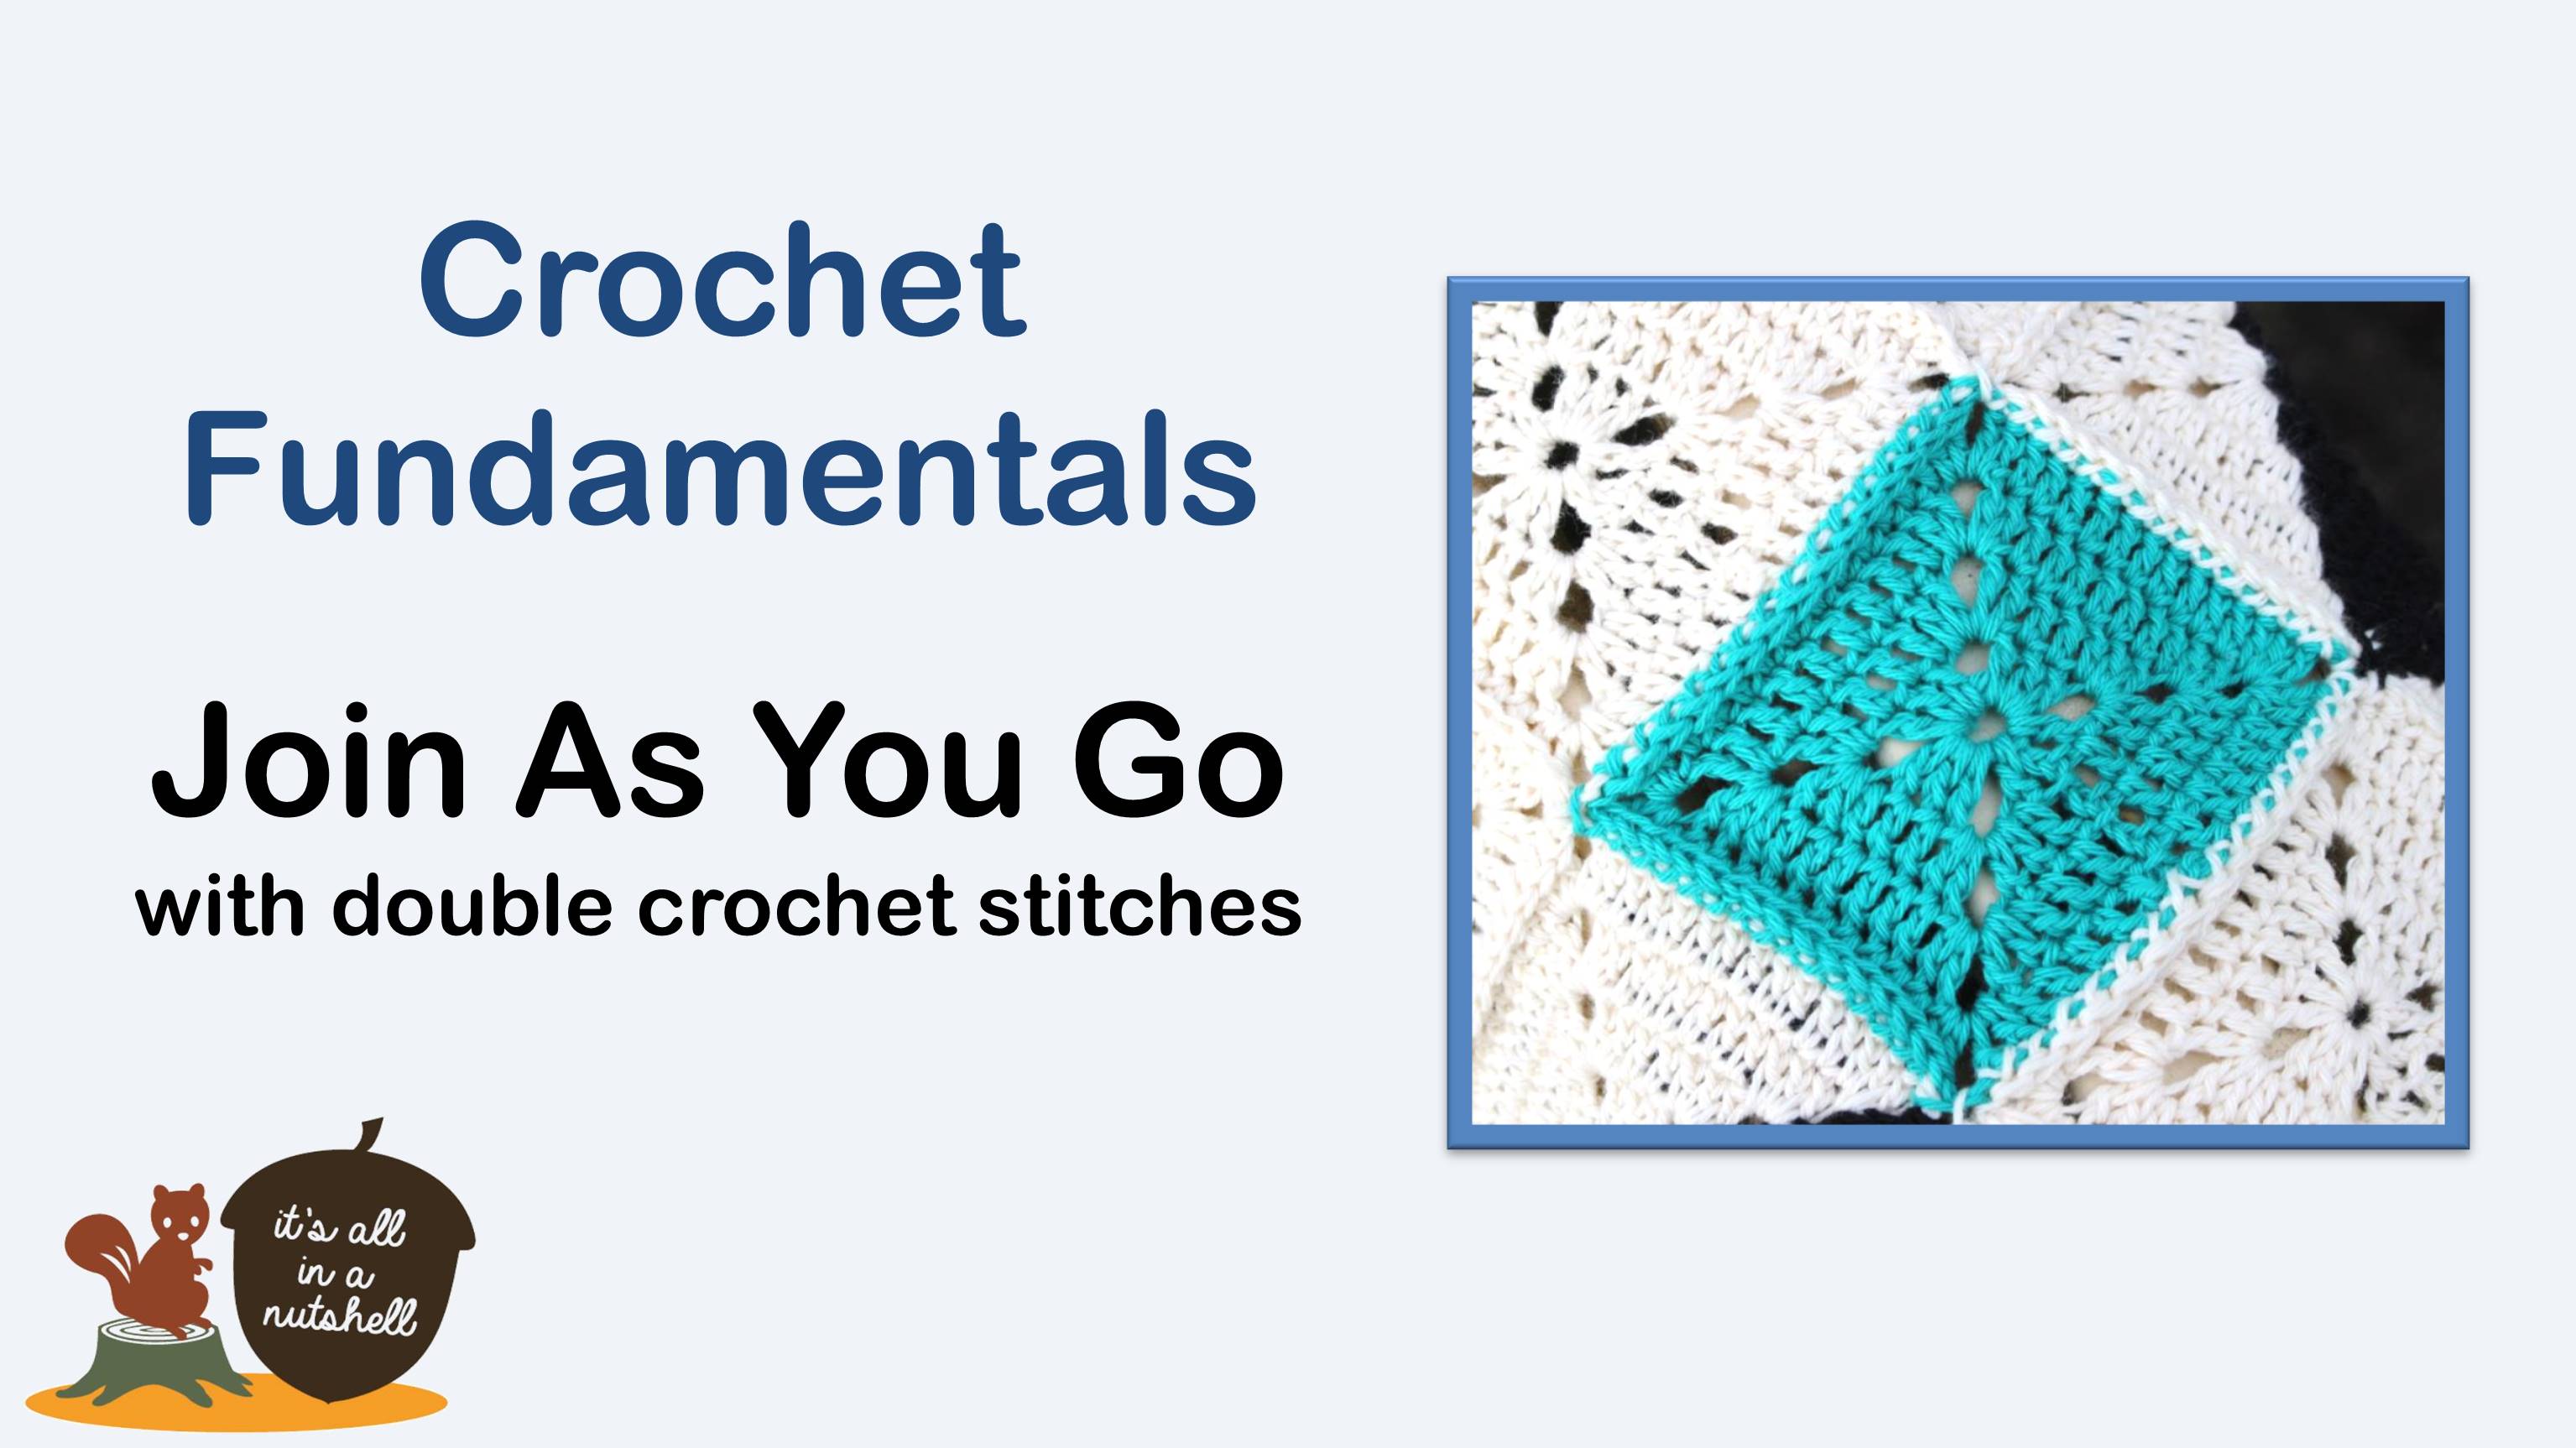
JAYG-dc YO, insert hook in designated stitch or space of working square, YO and pull up a loop, YO and take off 2 loops, insert hook in the corresponding stitch on the adjacent square which is to be joined to, YO and pull through all 3 loops on hook.
invisible join Cut yarn, pull yarn through last stitch made, thread yarn on needle, insert needle under both loops of first st after initial chain stitches, pull yarn through, insert needle into top of the last stitch made, pull yarn through.
[ … ] 1/2/3 times work the instructions after between [ ] the indicated number of times.
*…….; rep from * to end work the instructions after * and then repeat that section to the end of the row or round.
Video tutorials
This pattern does not include a full video tutorial, showing each and every step of the way. However, there are video tutorials which show certain parts of the pattern.
 |  |
 |   |
 |  |
Notes
Start with the first square in the bottom left of the diagram (row 1). Join the second square in the row to the first square. Continue joining squares till all squares of row 1 are joined. Repeat for row 2 again starting on the left hand side. By working from left to right and row by row all the joins will be oriented in the same direction. This gives a more esthetic finish.
The pattern systematically walks you through the squares up to the end of row 2. After that, the squares are all worked in similar ways to those in rows 1 and 2, dependent on if it’s a solid or split square and if the square is joined on one or two edges. I assume that by the end of row 2, you see the method, and will work mostly from the chart.
When working the split granny squares, change color in the stitch indicated. Carry the yarn not used behind your work, working over it.
The chart shows the placement of the solid and split granny squares. A full square in only one color is a solid granny square and should be made in the corresponding color. A square made from two triangles in two different colors is a split granny square and should be worked in the two colors indicated.
Chart

Snowflake Blanket – Free Crochet Pattern
Row 1 of the blanket
Square 1: Solid granny square without join
Start by working the first square on the blanket. This is the square in the bottom left corner of the chart (row 1, column 1). This square is a solid square, with only one color.
Round 1 (RS) With white, ch4, close in first st to form a ring, ch3 (counts as 1dc here and throughout), 1dc in ring, [ch2, 3dc in ring] 3 times, ch2, 1dc in ring, close with ss in first st.
[3 dc]
Round 2 (RS) ch3, 1dc in next st, [(2dc, ch2, 2dc) in ch2-sp, 1dc in next 3 sts] 3 times, (2dc, ch2, 2dc) in ch2-sp, 1dc in next st, close with ss in first st.
[7 dc]
Round 3 (RS) ch3, 1dc in next 3 sts, ((2dc, ch2, 2dc) in ch2-sp, 1dc in next 7 sts] 3 times, (2dc, ch2, 2dc) in ch2-sp, 1dc in next 3 sts, close with ss in first st.
[11 dc]
Round 4 (RS) ch3, 1dc in next 5 sts, [(2dc, ch2, 2dc) in ch2-sp, 1dc in next 11 sts] 3 times, [(2dc, ch2, 2dc) in ch2-sp, 1dc in next 5 sts, close ss in first st.
[15 dc]
Round 5 (RS) ch3, 1dc in next 7 sts, [(2dc, ch2, 2dc) in ch2-sp, 1dc in next 15 sts] 3 times, (2dc, ch2, 2dc) in ch2-sp, 1dc in next 7 sts, close with invisible join in first st.
[19 dc]
—xxx—
Square 2: Solid granny square with join on one edge
Now work the second square of the blanket. This is the second square in the bottom row of the chart (row 1, column 2). This square is a solid square, with only one color and is joined to the first square already worked using a JAYG method. The description given here is for joining on edge 2. This part of the pattern is applicable to all solid colored squares, joined on one edge.
Rounds 1 to 4 As Rounds 1 to 4 for Solid granny square without join.
Round 5 (RS) ch3, 1dc in next 7 sts, 2dc in ch2-sp, ch1, ss in adjacent square’s ch2-sp, JAYG-dc in next 2 sts on adjacent square and in ch2-sp of working square, JAYG-dc in next 15 sts, JAYG-dc in next 2 sts on adjacent square and in ch2-sp of working square, ss in adjacent square’s ch2-sp, ch1, 2dc in ch2-sp of working square, 1dc in next 15 sts, (2dc, ch2, 2dc) in ch2-sp, 1dc in next 15 sts, (2dc, ch2, 2dc) in ch2-sp, 1dc in next 7 sts, close with invisible join over first st.
[19 dc]
—xxx—
Squares 3 to 17: Solid granny square with join on one edge
The third square (row 1, column 3), and all following squares on row 1, are a repetition of the second square, namely a solid granny square with the join on one edge. Work all other squares on row 1 in the same way as the second square.
—xxx—
Row 2 of the blanket
Square 1: Solid granny square with join on one edge
Work the first square (row 2, column 1), in the same way as for a solid square with the join on one edge worked in row 1.
—xxx—
Square 2: Solid granny square with join on two edges
The second square (row 2, column 2), has a join on two edges. This square is a solid square, with two joins along two different edges worked using a JAYG method. The description given here is for joining on edges 2 and 3. This part of the pattern is applicable to all solid colored squares, joined on two edges.
Rounds 1 to 4 As Rounds 1 to 4 for Solid granny square without join.
Round 5 (RS) ch3, 1dc in next 7 sts, 2dc in ch2-sp, ch1, ss in first adjacent square’s ch2-sp, JAYG-dc in next 2 sts on first adjacent square and in ch2-sp of working square, JAYG-dc in next 15 sts, JAYG-dc in next 2 sts on first adjacent square and in ch2-sp of working square, ss in first adjacent square’s ch2-sp, ss in second adjacent square’s ch2-sp, JAYG-dc in next 2 sts on second adjacent square and in ch2-sp of working square, JAYG-dc in next 15 sts, JAYG-dc in next 2 sts on second adjacent square and in ch2-sp of working square, ss in second adjacent square’s ch2-sp, ch1, 2dc in ch2-sp, 1dc in next 15 sts, (2dc, ch2, 2dc) in ch2-sp, 1dc in next 7 sts, close with invisible join over first st.
[19 dc]
—xxx—
Squares 3 to 7: Solid granny square with join on two edges
The next 5 square on row 2, namely square (row 2, column 3) up to and including square (row 2, column 7), are a repetition of the second square in row 2. Work all these squares on row 2 in the same way as the second square of row 2.
—xxx—
Square 8: Split granny square with join on two edges
The following square (row 2, column 8), is a split granny square. This square is made in two colors and is joined on two edges with the blanket using a JAYG method. The description given here is for joining on edges 3 and 4. This part of the pattern is applicable to all split granny squares, joined on two edges and can be worked in any two colors as needed. However, please note that the orientation of the split granny square can be different, so the joins can be on different edges. Please rotate the square accordingly.
Spit granny square
Round 1 (RS) With dark blue, ch4, close in first st to form a ring, ch3, 1dc in ring, ch2, 3dc in ring, ch1, change to white and ch1 (with this ch1, you change to color white), 3dc in ring, ch2, 3dc in ring, ch1, change to dark blue yarn and ch1, 1dc in ring, close with ss in first st.
[3 dc]
Round 2 (RS) Continue with dark blue yarn, ch3, 1dc in next st, (2dc, ch2, 2dc) in ch2-sp, 1dc in next 3 sts, 2dc in ch2-sp, ch1, change to white yarn and ch1, 2dc in ch2-sp, 1dc in next 3 sts, (2dc, ch2, 2dc) in ch2-sp, 1dc in next 3 sts, 2dc in ch2-sp, ch1, change to dark blue yarn and ch1, 2dc in ch2-sp, 1dc in next st, close with ss in first st.
[7 dc]
Round 3 (RS) Continue with dark blue yarn, ch3, 1dc in next 3 sts, (2dc, ch2, 2dc) in ch2-sp, 1dc in next 7 sts, 2dc in ch2-sp, ch1, change to white yarn and ch1, 2dc in ch2-sp, 1dc in next 7 sts, (2dc, ch2, 2dc) in ch2-sp, 1dc in next 7 sts, 2dc in ch2-sp, ch1, change to dark blue yarn and ch1, 2dc in ch2-sp, 1dc in next 3 sts, close with ss in first st.
[11 dc]
Round 4 (RS) Continue with dark blue yarn, ch3, 1dc in next 5 sts, (2dc, ch2, 2dc) in ch2-sp, 1dc in next 11 sts, 2dc in ch2-sp, ch1, change to white yarn and ch1, 2dc in ch2-sp, 1dc in next 11 sts, (2dc, ch2, 2dc) in ch2-sp, 1dc in next 11 sts, 2dc in ch2-sp, ch1, change to dark blue yarn and ch1, 2dc in ch2-sp, 1dc in next 5 sts, close with ss in first st.
[15 dc]
Round 5 (RS) Continue with dark blue yarn, ch3, 1dc in next 7 sts, (2dc, ch2, 2dc) in ch2-sp, 1dc in next 15 sts, 2dc in ch2-sp, ch1, change to white yarn and ss in first adjacent square’s ch2-sp, JAYG-dc in next 2 sts on first adjacent square and in ch2-sp of working square, JAYG-dc in next 15 sts, JAYG-dc in next 2 sts on first adjacent square and in ch2-sp of working square, ss in first adjacent square’s ch2-sp, ss in second adjacent square’s ch2-sp, JAYG-dc in next 2 sts on second adjacent square and in ch2-sp of working square, JAYG-dc in next 15 sts, JAYG-dc in next 2 sts on second adjacent square and in ch2-sp of working square, ss in second adjacent square’s ch2-sp, change to dark blue yarn and ch1, 2dc in ch2-sp, 1dc in next 7 sts, close with invisible join over first st.
[19 dc]
—xxx—
Square 9: Solid granny square with join on two edges
The ninth square (row 2, column 9), is a solid square and has a join on two edges. Work this square in the same way as all solid squares with joins on two edges worked so far.
—xxx—
Square 10: Split granny square with join on two edges
The tenth square (row 2, column 10), is a split granny square. This square is made in two colors and is joined on two edges with the blanket using a JAYG method. Repeat the instructions given for square 8 (row 2, column 8), but exchange the order of the blue and white yarn around. In other word, when the pattern says white, use dark blue, and when the pattern says dark blue, use white. This way the join will still be on edges 3 and 4, but the square will be rotated in the correct position.
—xxx—
Squares 11 to 17: Solid granny square with join on two edges
All remaining squares in row 2, namely square (row 2, column 11) up to and including square (row 2, column 17), are solid squares and have joins on two edges. Work these squares in the same way as all solid squares with joins on two edges worked so far.
—xxx—
Row 3 of the blanket
Work all rows of the blanket, following the chart. Work solid or split granny squares as needed, in the colors indicated in the chart. It is easy to accidentally have a split square oriented in the wrong direction, so keep paying attention to how you are placing each square.
—xxx—
Border of the blanket
Round 1 (RS) Attach white yarn with a ss in ch2-sp of top right hand corner of the blanket. Ch1 (does not counts as st), (2sc, ch2, 2sc) in ch2-sp, *[1sc in next 19 sts, 1sc in next 2 ch2-sps] 16 times, 1sc in next 19 sts, (2sc, ch2, 2sc) in ch2-sp, [1sc in next 19 sts, 1sc in next 2 ch2-sps] 24 times, 1sc in next 19 sts, (2sc, ch2, 2sc) in ch2-sp; rep from * one more time omitting last corner. Close with ss on first st.
[359 sc on short side, 527 sc on long side]
Round 2 (RS) Ch1 (does not count as st), 1sc in each st to end, *3sc in ch2-sp, 1sc in each st to end; rep from * 3 more times omitting final sts. Close with invisible join on first st.
[361 sc on short side, 529 sc on long side]
—xxx—
Finishing
Weave in all ends and block the blanket to the final measurements. The dark blue yarn can run out when washing, so be careful. A color catcher can help prevent disasters.
This blanket is A LOT of work and takes hours and hours to complete, but the finished result is definitely one to enjoy for many years.
#itsallinanutshell
If you are making something with one of my patterns or one of my videos, I would love to see your work. Use the hashtag #itsallinanutshell on Instagram to help me find it, share your work in my It’s all in a Nutshell Crochet Nuts group on Facebook or tag me in one of your posts.
With love,
Esther
Follow me on
Facebook, YouTube, Ravelry, Instagram
This post contains affiliate links. Please read my disclosure and copyright policy. All opinions are my own and I only link to products I use or would use. Thank you for using the links on my blog and supporting my work.
Copyright (c) 2014-2025 It’s all in a Nutshell Creations. All rights reserved.
Discover more from It's all in a Nutshell Crochet
Subscribe to get the latest posts sent to your email.
Baie Dankie vir die Snowflake Blanket Patroon
Thank you very, very much for the beautiful pattern!