Corner-to-Corner crochet, or C2C for short, is a fun and relaxing technique to work everything from very simple to very intricate designs and blankets. In this post I would like to help you master C2C.

The basic idea….
The basic idea of C2C is that you start in one corner and work along the diagonal to the other corner; hence the name corner-to-corner. Making squares and rectangles is the easiest, but as such you could also make other shapes by increasing or decreasing the diagonal as needed.
Flow of the method
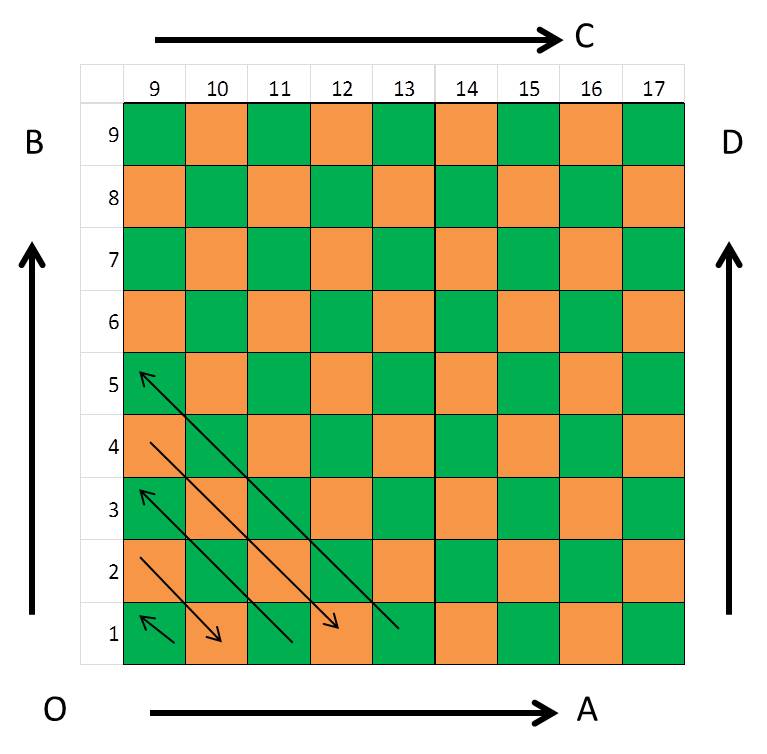
Below I give you a universal pattern for making a C2C project. The idea is that you start in the bottom-left corner at point O and then work the first pixel. You then turn and come back to work 2 pixels in the opposite direction, turn again and work 3 pixels in the opposite direction again, and so on and so forth. You follow the arrows on the chart working one diagonal after another.
Initially you are increasing your work in two directions, direction A and B. At a certain point A is large enough and then you start decreasing your diagonal in direction D. If you are making a square A = B, which means you decrease the diagonal in both directions, both direction C and D. Otherwise you keep A constant and increase B till B is the correct size, and finally you decease both A and B by working in directions C and D.
C2C Video tutorial
And after that very mathematical explanation I have you all confused, right? Maybe it is just easier to watch a video in which I show you exactly how to do C2C.
In the video I use a small square design with a two-colored diamond to show you the steps involved in C2C. It is the way I do it, maybe there are others that do the method in a different way, but I have found that this works for me. I show you how to increase and decrease your diagonal as well as how to change color.

C2C Square – General written pattern
If you prefer a written pattern, here I have a general pattern for C2C. This does not specify any color changes nor does it say when to start decreasing. This is to help you see the similarities between any given written C2C instruction and the video.
Abbreviations
Please note that US Crochet Terminology is used for this pattern. If you are more familiar with UK terms, please use this conversion chart as needed.
- ss – slip stitch
- s – stitch
- ch – chain
- dc – double crochet
- RS – right side
- WS – wrong side
- pixel – ch3 and 3dc worked into a ch3-space
Increasing the diagonal
In the first part of the pattern increase the diagonal till the width of the main part of the blanket is reached, this means the A is the correct length.
Row 1 (RS) Ch6 (counts as ch3 and 1dc), 1dc in fourth ch from the hook and in each of the next 2 ch to the end. Turn your work. [1 pixel]
Row 2 (WS) Ch6 (counts as ch3 and 1dc), 1dc in fourth ch from the hook and in each of the next 2 ch to complete a pixel. With the WS of pixel 1 facing and the RS of the pixel of Row 2 just worked facing, line up the top of the dc just worked with the top of the dc’s from Row 1 so that the 2 pixels are touching. ss in the space created by the ch3 at the top of the pixel of Row 1. ch3, 3dc in ch3-space. Turn your work. [2 pixels]
Row 3 (RS) Ch6 (counts as ch3 and 1dc), 1dc in fourth ch from the hook and in each of the next 2 ch to complete a pixel. Rotate the pixel just worked so that you can ss in the ch3-space at the top of the last block worked from Row 2. ch3, 3dc in same ch3-space as the ss. ss in ch3-space at the top of the next pixel, ch3, 3dc in the same ch3-space as the ss. Turn your work. [3 pixels]
Row 4 Ch6 (counts as ch3 and 1dc), 1dc in fourth ch from the hook and in each of the next 2 ch to complete a pixel. Rotate the pixel just worked so that you can ss in the ch3-space at the top of the last block worked from the previous row. * ch3, 3dc in same ch3-space as the ss. ss in ch3-space at the top of the next pixel. * Repeat from * to * until you have worked a ss in the ch3-space of the last block of the previous row. ch3, 3dc in the same ch3-space as the ss. Turn your work. [1 pixels more than the previous row]
Rows 5 – ? Repeat Row 4 till the correct width of A is obtained.
Constant diagonal
In this part the diagonal is kept constant. This means that the number of pixels per row is the same for each row. Looking at the checkerboard, this means that A is kept constant and B is increased. If you work a square, i.e. A = B, then skip this part and go to the next stage.
Row (?+1) Turn your work. ss into the next stitches and into the ch3-space. * ch3, 3dc in same ch3-space as the ss. ss in ch3-space at the top of the next pixel. * Repeat from * to * until you have worked a ss in the ch3-space of the last block of the previous row. ch3, 3dc in the same ch3-space as the ss. Turn your work.
Row (?+2) Ch6 (counts as ch3 and 1dc), 1dc in fourth ch from the hook and in each of the next 2 ch to complete a pixel. Rotate the pixel just worked so that you can ss in the ch3-space at the top of the last block worked from the previous row. * ch3, 3dc in same ch3-space as the ss. ss in ch3-space at the top of the next pixel. * Repeat from * to * until you have worked a ss in the ch3-space of the last block of the previous row. Do not work a pixel on top of the last pixel from the previous row.
Rows (?+3) to ? Repeat Rows (?+1) and (?+2) till B is the correct length.
Decreasing the diagonal
In this part of the pattern the diagonal is decreased to form a square, if A = B, or a rectangle. You are now working in both direction C and D.
Row (?+1) Turn your work. ss into the next stitches and into the ch3-space. * ch3, 3dc in same ch3-space as the ss. ss in ch3-space at the top of the next pixel. * Repeat from * to * until you have worked a ss in the ch3-space of the last block of the previous row. Turn your work without working on top of the last pixel. [1 pixels less than the previous row]
Rows (?+1) … end Repeat Row (?+1) till you have filled out the square or rectangle.
Two Examples
I hope this tutorial has helped you see the logic behind C2C; it a very mathematical and rhythmic method. I first did C2C for Last Dance on the Beach CAL in which I worked stripes by changing color at the end of a diagonal. Seriously, the sky is the limit here. I would love to see what you have made using C2C. Feel free to share on my Facebook page.

A second example of using C2C is my Temperature blanket 2018. There I use the method to make a fun effect temperature blanket.

With love,
Esther
This post contains affiliate links. Please read my disclosure and copyright policy. All opinions are my own and I only link to products I use or would use. Thank you for using the links on my blog and supporting my work.
Copyright (c) 2014-2026 It’s all in a Nutshell Creations. All rights reserved.
Discover more from It's all in a Nutshell Crochet
Subscribe to get the latest posts sent to your email.
Have just found your site and look forward to reading your posts. Good explanation which I understood. Yay!
Happy you could follow, i was concerned that Maybe i didnt write it easy enough.
Hi Esther, You really are amazing! So full of energy and generous with your know how! I can’t wait to try C to C! Thanks for YOU! Lib
Sent from my iPad
>
Give it a go, it’s a very addictive stitch 🙂
Hi Esther I follow all your crochet blogs and patterns and wonder if you have any c2c squares/graphs patterns for a wild animal blanket that i am making for my twin grandsons . I have looked everywhere but can only find a hippo and an elephant. Thanks Sue
Hi Sue,
No, I don’t have any wild animatie for a C2C. Sorry that I can’t help you ?
there are four on pinterest, a deer, horse, the hippo and an elephant
I am addicted to your videos – I followed the whole Sophie on your videos and thought they were great – best way to learn how to do it properly. Thanks for all of it, its amazing and keep them coming!
El
x
I love starting new projects with the anticipation that I might learn a new technique and new stitches. I’ve dabbed in so much over the past year and a half – amigurumi, overlay crochet, weaving, tapestry crochet, bead crochet, but this is the only technique I haven’t tried.
I’ve been wanting to make a laptop cover for myself – and then I saw this in my feed. Thank youuuu
Hi Esther.
I started “Last Dance on the Beach about 3weeks ago. I am just starting Week 5 and couldn’t have done it without your videos. I have also ordered the Pastel Peacock bag and am so looking forward to the CAL starting in August. It sounds very interesting. I just hope that I can keep up with it. I am looking forward to your videos. Thank you
No worries if you don’t keep up, everything will stay available online
Reblogged this on adornosmalulu.
Thanks Esther! A great video, and very easy to follow! I’m new to your blog, and looking forward to reading more of your posts.
Best wishes,
Alison x
Welcome ?
Thank you so much for the the instructions. Its so easy to follow. Can’t wait to start to get started on a blanket . Thank you again.
Feel free to share your work on my Facebook page ?
Reblogged this on Art, Music, & Life By Abbey and commented:
Excellent
I found Sophies addictive, couldn’t wait to do the next row – you explained it all so well, thank you. Perhaps you can help me? I am busy doing a cat afgan which states you must not carry the yarn, I am finding the colour change rather messy and loose, any suggestions?
Try pulling on both yarns after changing color to keep the stitch as small as possible
Thanks! tried that but the stitch then becomes very tight, but will soldier on!!!
Thank you so much for these instructions! I was ready to toss the C2C graph afghan that I am working on. I finished increasing rows but could not get the 3 rows that have same stitch count and decrease to turn out right. First time I tried your instructions it worked. Thanks again!!!!!!
Fabulous, you can do more than you think ?
Thank you so much! You made this really easy. Love the way it looks.
You’re welcome
Can I just ask you a question? Please
When using a pre printed chart
does it need to be flipped as it is written for the right handed person thank you loving the video really helped me so thank you again
no, you can start in either corner, so it doesn’t have to be flipped.
Can you help me understand your video as left handed but when you half to work like 3 rows to keep your count to turn corner do you increase one one side then increase on other side as I’m confused as doing a Grantham or can you give me an easy explanation just discovered your site love how you show each pixel no one else does that and you also go nice and slow and your hands etc aren’t in the way could you please email me thanks
I’m sorry, I don’t really follow your question. So this is a bit of a general answer, but maybe it helps you.
1. Increasing diagonal. When you are making the first triangle of a square you will add a pixel on both sides of the diagonal to make it longer.
2. when keeping a diagonal constant, you will add one pixel to one end and decrease one pixel on the other end. This you will do when your blanket is rectangular.
3. decreasing diagonal, when you are making the second triangle that makes up a square, you will decrease a pixel on both sides of the diagonal.
I still don’t understand