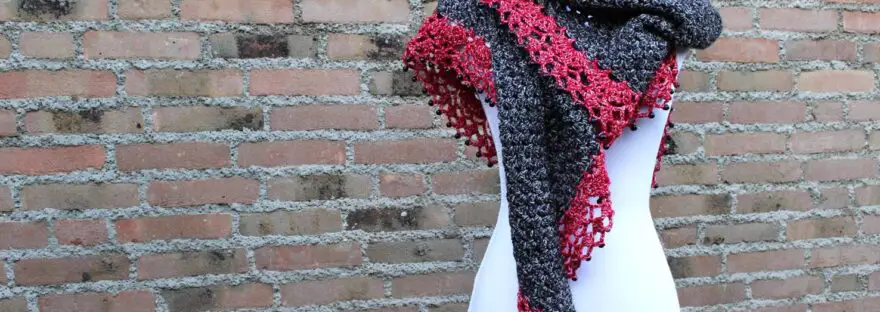
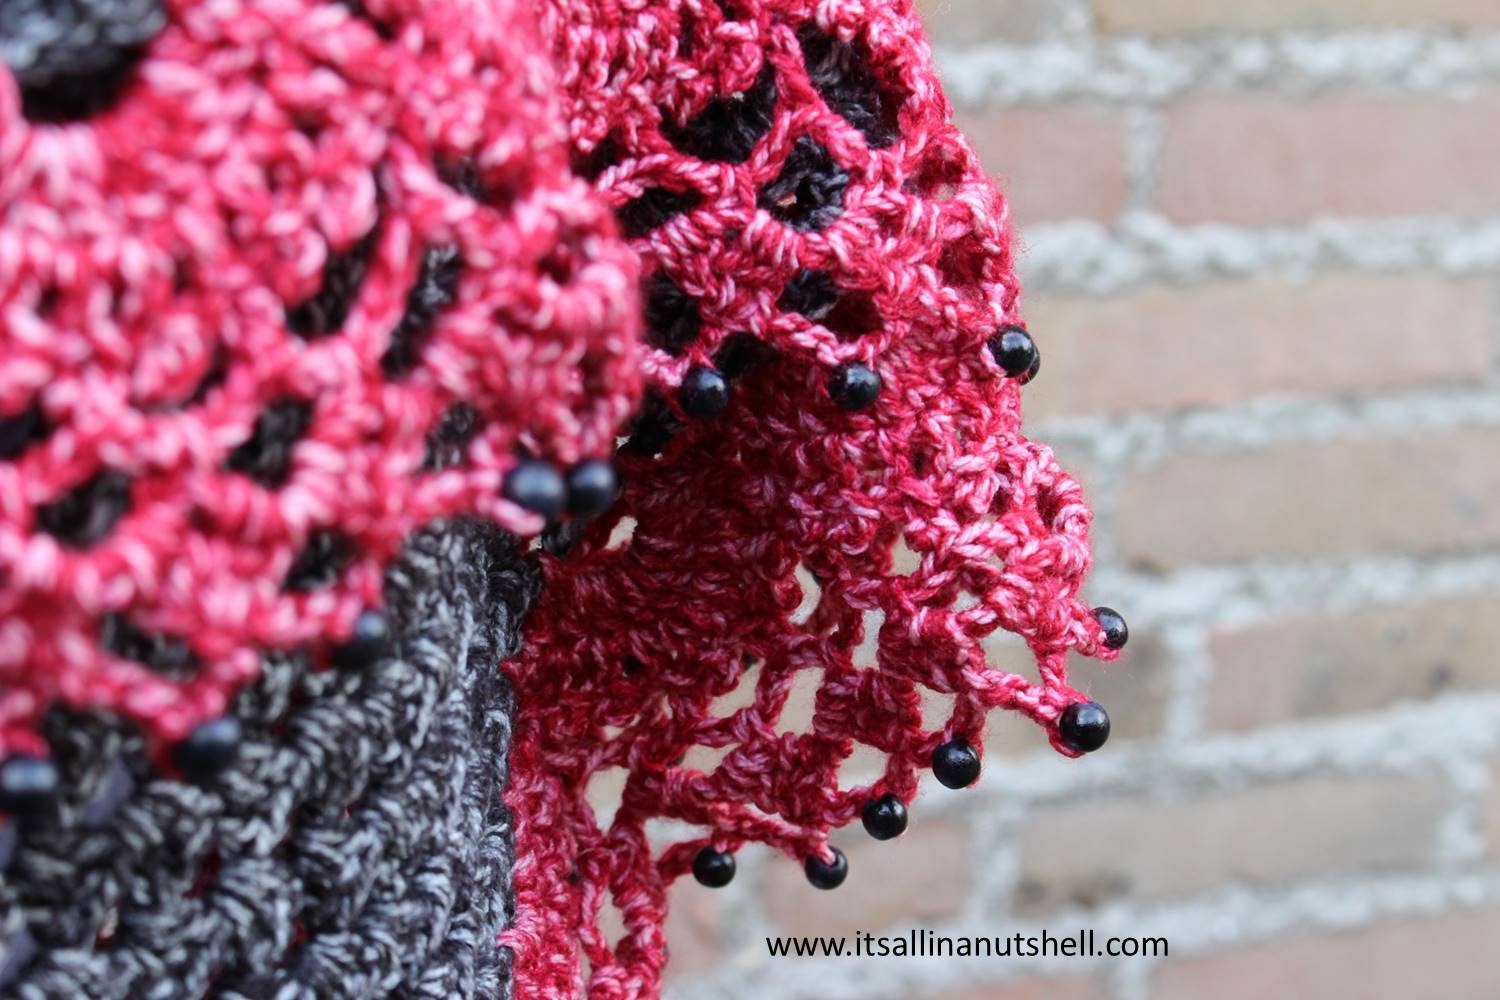
Here is the free crochet pattern for my Touch of Velvet wrap. It’s an elegant design that is finished with a playful beaded edge. I must say that I am really happy with this design and it’s surprisingly warm with the Color Crafter Velvet yarn.

Materials
You will need the following materials to make the Touch of Velvet Wrap
- 3 x Scheepjes Color Crafter Velvet – Kelly (841) – BLACK
- 1 x Scheepjes Color Crafter Velvet – Bogart (847) – DARK RED
- 105 x 8mm black wooden or glass beads
- 4mm crochet hook
- needle to tread the beads on your yarn
Scheepjes Colour Crafter Velvet is no longer available. A good replacement yarn in Scheepjes Colour Crafter in similar colors.
Scheepjes Colour Crafter is available in over 90 colors from Wool Warehouse (UK/Int), Jimmy Beans Wools (USA), The Knitting Network, Caro’s Atelier (NL/EU) or your local Scheepjes stockist.

Gauge and size
Gauge is not essential for this project and it’s not needed to make a gauge swatch. If your gauge is similar to mine your final wrap will be approximately 200cm wide and 90cm high.
Resources
Translations
Abbreviations
This pattern uses US crochet terms. If you are more familiar with UK crochet terms, please see this conversion table for the most common terms.
- ch – chain
- sc – single crochet
- dc – double crochet
- ss – slip stitch
- st – stitch
- picot – ch3, ss in first chain stitch worked
- dc4tog – 4 double crochet stitches worked together
- YO – yarn over
Special stitches
SDC – Special Double Cluster. A dc4tog with the first 2 legs in the first ch5-space and the last 2 legs in the second ch5-space.
YO, pull up a loop in current ch5-space, take off 2 loops, 2 loops on your hook. YO, pull up a loop in current ch5-space, take off 2 loops, 3 loops on your hook. YO, pull up a loop in next ch5-space, take off 2 loops, 4 loops on your hook. YO, pull up a loop in next ch5-space, take off 2 loops, 5 loops on your hook. YO and take off all loops on your hook.
Standing SDC – Standing Special Double Cluster.
Attach yarn with a ss in first ch5-space, ch2, YO, pull up a loop in first ch5-space, take off 2 loops, 2 loops on your hook. YO, pull up a loop in second ch5-space, take off 2 loops, 3 loops on your hook. YO, pull up a loop in second ch5-space, take off 2 loops, 4 loops on your hook. YO and take off all loops on your hook.

Video tutorial
To make this pattern accessible to as many people as possible I have made a video tutorial showing the steps involved in making this wrap.
Touch of Velvet Wrap – Free Crochet Pattern
The Touch of Velvet Wrap consists of a triangular base worked in granny stitch followed by a lacy border edged with beads.
Base
Work the base using Scheepjes Color Crafter Velvet – Kelly (841) BLACK and a 4mm hook.
Row 1 With a slip knot on your hook, ch4 and close with a ss in the first ch, ch4 (counts as 1dc and ch1), in the ch4-loop work 3dc, ch3, 3dc, ch1, 1dc. Turn your work.
Row 2 Ch4 (counts as 1dc and ch1), 3dc in the next ch1-space, ch1 and skip the next 3dc, [3dc, ch3, 3dc] in the ch3-space, ch1 and skip the next 3dc, 3dc in the next ch1-space, ch1, 1dc on the last dc (this will be the 3rd ch of the starting ch4 of row 1). Turn your work.
Row 3 Ch4 (counts as 1dc and ch1), * 3dc in the next ch1-space, ch1 and skip the next 3dc. * Repeat * to * 1 more time. [3dc, ch3, 3dc] in the ch3-space, ch1 and skip the next 3dc, 3dc in the next ch1-space, ch1 and skip the next 3dc, 3dc in the next ch1-space, ch1,
1dc on the last dc (this will be the 3rd ch of the starting ch4 of row 2). Turn your work.
Row 4 Ch4 (counts as 1dc and ch1), *3dc in the next ch1-space, ch1 and skip the next 3dc. * Repeat * to * 2 more times. [3dc, ch3, 3dc] in the ch3-space, ch1 and skip the next 3dc, *3dc in the next ch1-space, ch1 and skip the next 3dc. * Repeat * to * 1 more time.
3dc in the next ch1-space, ch1, 1dc on the last dc (this will be the 3rd ch of the starting ch4 of row 3). Turn your work.
Row 5 – 52 Repeat row 4 where you increase the number of repeats along the edges of the triangle. Cut your yarn, cast off and work away your yarn tails. At this point you will have a large triangle and it will look something like this.

Edge
Work the edge using Scheepjes Color Crafter Velvet – Bogart (847) RED and a 4mm hook. First work rows 1 to 5 and fasten off. Thread the beads on your yarn and then work the final row of the wrap.
Row 1 With a slip knot on your hook, start with a standing sc in the first dc. *1sc in next ch1-space, ch5, skip the next 3dc. * Repeat * to * till the ch3-space. (1sc, ch5, 1sc) in the ch3-space to form the tip of the wrap. *ch5, skip the next 3dc and work 1sc in the next ch1-space. * Repeat * to * till the last ch1-space. 1sc on the last dc. Turn your work.
Row 2 Ch5 (counts as 1dc and ch2), skip next sc, *1sc in next ch5-space, skip next sc, 8dc in next ch5-space, skip next sc, 1sc in next ch5-space, skip next sc, ch5. * Repeat * to * till the ch5-space before the tip of the wrap. 1sc in next ch5-space, skip next sc, 12dc in ch5-space at the tip of the wrap, skip next sc, 1sc in next ch5-space, skip next sc, ch5.
Repeat * to * till there are three ch5-spaces left. 1sc in next ch5-space, 8dc in next ch5-space, 1sc in last ch5-space. Ch2, skip next sc, 1dc on last sc. Turn your work.
Row 3 Ch1 (does not count as a st), 1sc in same st, skip the ch2-space and the next sc. * (1dc on next dc, 1 picot) 7 times, 1dc on last dc, skip next sc, 1sc in next ch5-space, skip next sc. * Repeat * to * till the tip of the wrap. (1dc on next dc, 1 picot) 11 times, 1dc on last dc, skip next sc, 1sc in next ch5-space, skip next sc. Repeat * to * till the last ch5-space, (1dc on next dc, 1 picot) 7 times, 1dc on last dc. Skip next sc and ch2-space. 1sc on last dc (which is the 3rd ch of the starting ch5 of row 2). Turn your work.
Row 4 Ch8 (counts as 1dc and ch5), * 1sc on 3rd picot, ch5, 1sc on 5th picot, ch5, 1dc in next sc, ch5. * Repeat * to * till the tip of the wrap. 1sc on 3rd picot, ch5, 1sc on 5th picot, ch5, 1sc on 7th picot, ch5, 1sc on 9th picot, ch5, 1dc on next sc, ch5. Repeat * to * till the end of the wrap omitting the last ch5. Turn your work.
Row 5 Ch8 (counts as 1dc and ch5), * 1sc in next ch5-space, ch5. * Repeat * to * till the end of the wrap. 1sc in last st (which is the 3rd ch of the starting ch8 of row 4). Fasten off. Turn your work.
Row 6 With a needle thread 105 beads on your yarn. Push the beads that you don’t need forward on your yarn as you work bringing 1 bead at a time to your hook as needed. In the beginning it will be difficult to push the beads forward as you will have 100+ beads on your yarn, but as you work in the beads it becomes easier to move them forward. Don’t try to push 100 beads forward at once, but make batches of 10 to 20 beads at a time. Note that the SDC are worked in such a way that they share the ch5-spaces.
Work a Standing SDC over the first and second ch5-spaces of row 4. *Ch3, bring 1 bead to your hook and ch1 over the bead securing it in place, ch3, SDC in the same ch5-space where you finished the previous SDC and the next ch5-space. * Repeat * to * till the end of the wrap. Cut your yarn and work away all yarn tails.
For best results, block your work.

Support me and my work
There are many ways that you can support me and my work and most of them are free. By visiting my website you are already supporting me! Also by viewing any of the free videos on my YouTube channel you support me.
Other ways to support me are to make a purchase from one of my affiliates. I get a small commission based on your purchase after you click one of the links on my website. It costs you absolutely nothing but helps me a lot. My affiliates are Amazon.co.uk, KnitPicks, Wool Warehouse, Jimmy Beans Wool, Minerva Craft, The Knitting Network, Love Crafts, and Caro’s Atelier.
If you would like to support me in ways that are out of pocket for you, you could buy any of my patterns on Ravelry or my SHOP. You can also make a DONATION, which I really appreciate. Even a small amount helps me to keep my small business running.
With love,
Esther
This post contains affiliate links. Please read my disclosure and copyright policy. All opinions are my own and I only link to products I use or would use. Thank you for using the links on my blog and supporting my work.
Copyright (c) 2014-2026 It’s all in a Nutshell Creations. All rights reserved.
Discover more from It's all in a Nutshell Crochet
Subscribe to get the latest posts sent to your email.
the beaded trim make a simple shawl so stunning
Hi Esther,
I just ordered the yarn and some beautiful glass beads to make this. I have a long flight to Lisbon via the US coming up in two weeks, this will be a great airplane project! Thanks for getting this uploaded, and as always, thank you for the work you put into these patterns and videos! You are single-handedly turning me into a crocheter! =0}
Have a safe trip 🙂
Nicely done! Thumbs up.
Thank you 🙂
loving the rhythm of this on my hook: had to check how may chains on your picot on the video as you didn’t include it in the special stitches 😉 opted for one colour dk for mine, might try it in 4ply for finer finish **
Wonderful that you like the pattern. The picot is under the abreviationstove, but maybe it is more logica under the special Stitches?
Would love to see your work when completed ?
ah ha I didn’t see it in the abbreviations! all done apart from the last row as I need to get some beads ~ it’s here in my projects > http://www.ravelry.com/projects/chocolategirl64/touch-of-velvet-wrap
I would add beads in a different color to really make them pop. 🙂
Hello, what do you think of this yarn? The color is very similar to Stone washed black onyx, I think. Do you think you can use it instead of Stone washed? I know that one is acrylic, and the other is with cotton. Do Velvet is soft? Is color really is so similar to Stone washed?
I don’t really understand your question. I used Color Crafter for this design, not Stone Washed. If you want to use a different yarn you are welcome to do so.
I’m sorry, English is not my native language. I mean that I want to use a Velvet (colour Kelly) instead of Stone washed (colour black onyx) and do not know if the colors are very different. In the Internet can’t see well. I have not seen them live.
The yarn in the pattern is Color Crafter Velvet and NOT Stone Washed. I did not use Stone Washed.
The Stone Washed is has more muted white tone than the Color Crafter, but the finished look is similar.
Hi Esther, I have the yarn (three balls of CC Meppel and a CC Velvet Rogers) for this but have trouble finding beads. Where did you get them from? I’m in the Netherlands, just like you. Thanks for your reply
Hoi Janneke, ik heb mijn kralen hier gekocht: https://www.kralenwinkel-online.nl/
What is the finished size without the edge…..thank you.
The edge is about 8 to 10cm.
Beautiful shawl!
Thanks for sharing 🙂
Thank you
I’m on row 43…..think I’ve got enough wooden beads…..if not I’ll mix and match the ones I have……..really easy, so I can watch telly while I’m crocheting……:)
Sometimes an easy project is just what you need!
I’m making two as Christmas presents……..love the Yarn
I hope they will be much loved ?
This shawl is my absolute favorite to wear and make!!! I have made 6 of these for family and friends in different colors and each are beautiful!
Oh wow, that is zo great to hear!