
Mandalas are still a favorite of mine, and I really enjoyed designing my Bubbling Brook Mandala. It was originally published in CrochetNow magazine, but is now available to you for free. Of course, as you have come to expect from me, the patten comes including a free video tutorial to help you with the tricky bits.

Resources
- Bubbling Brook Mandalas on Ravelry
- PDF Pattern on Ravelry (buy directly)
- PDF Pattern on It’s all in a Nutshell SHOP
- Video tutorials – RIGHT HANDED
- Video tutorials – LEFT HANDED
- **Bubbling Brook Mandalas Yarn Kit**
- 3.0mm hook
- Social Media #itsallinanutshell
Pattern in one document
The pattern for Bubbling Brook Mandalas is available for free here on my website. If you prefer to have the pattern as a printable pdf document, you can purchase the pattern on Ravelry or in my SHOP for a small fee.
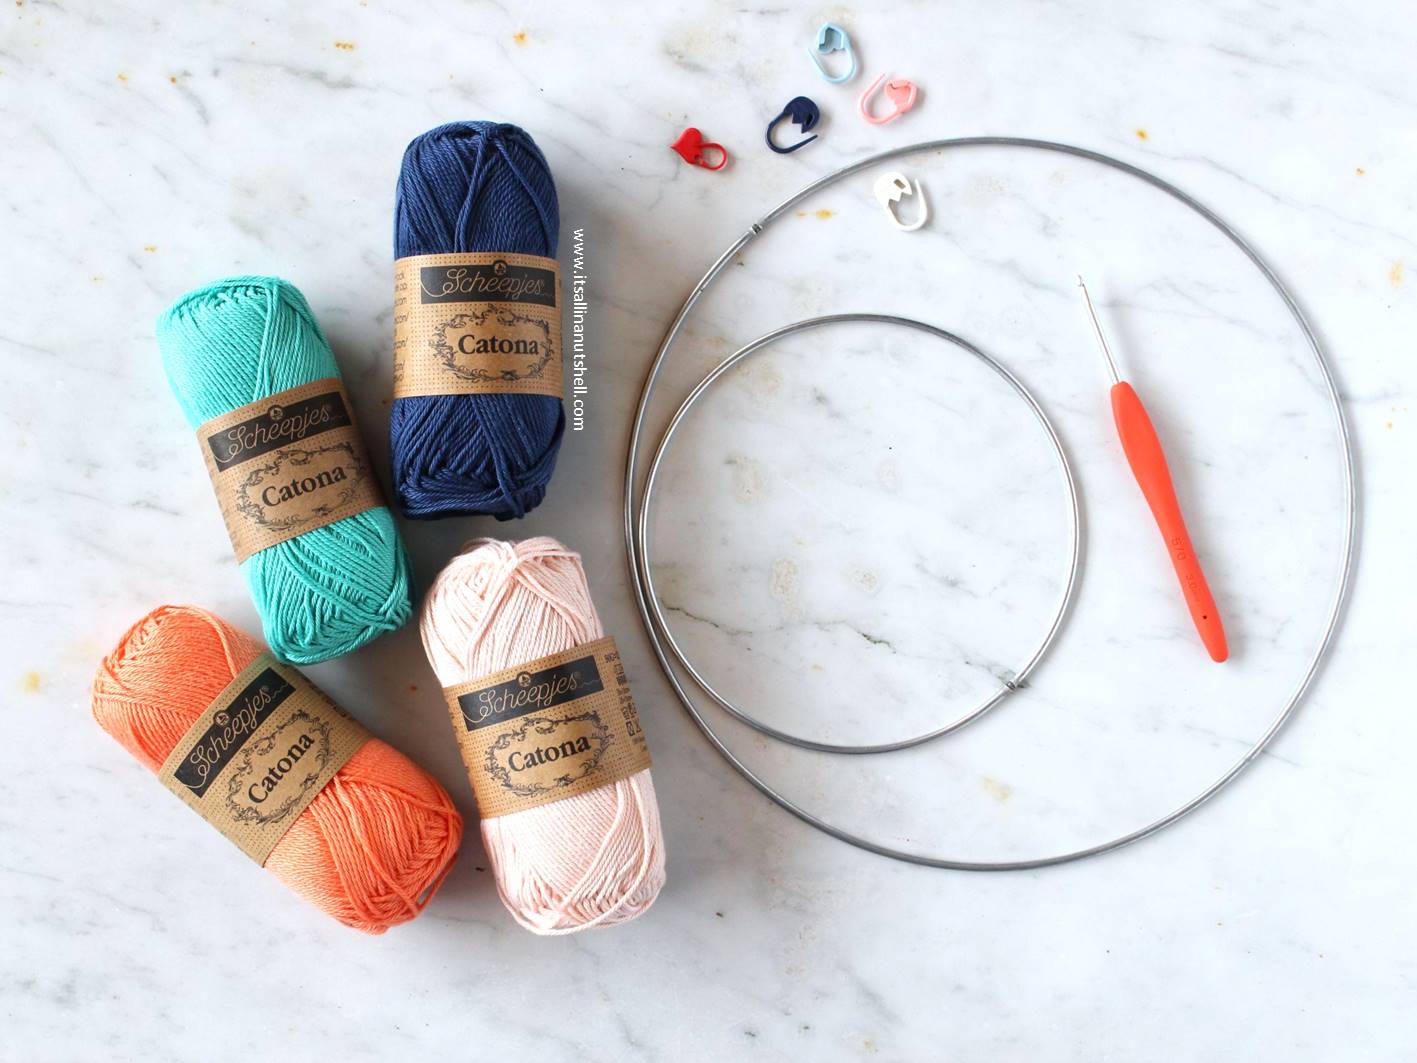
Materials
You will need 4 colors of Scheepjes Catona (50g/125m) yarn and 2 mandala rings to make your Bubbling Brook Mandalas. The sample shown uses the following colors
- 1 x Petal Peach 263 (Color A)
- 1 x Rich Coral 410 (Color B)
- 1 x Tropic 253 (Color C)
- 1 x Light Navy 164 (Color D)
In addition to the yarn, you will also need
Everything you need to make the Bubbling Brook Mandalas is available as a kit in my SHOP. The kit includes yarn, mandala rings and the pattern.
Scheepjes Catona is available from Amazon.co.uk, Wool Warehouse (UK), Jimmy Beans Wool (USA), The Knitting Network (UK), Love Crafts (USA / UK), Caro’s Atelier (NL / EU), and many other Scheepjes stockists.
Abbreviations
This pattern uses US terms
bpsc back post single crochet
ch chain
ch-sp chain space
dc double crochet
fphdc front post half double
hdc half double crochet
sc2tog two single crochet stitches worked together over the indicated stitches
ss slip stitch
st(s) stitch(es)
tr treble crochet
popcorn 5dc in indicated stitch, remove hook from working loop, insert hook from front to back in first dc made, replace working loop on hook, pull loop through stitch, ch1 to close.
Bubbling Brook Mandalas – Free Crochet Pattern
Maxi Bubbling Brook Mandala
Round 1 With Color C, ch4, join with ss in first ch to form a ring. Working into the ring, ch4 (counts as tr), 15tr in ring, close with invisible join. [16 tr]
Round 2 Join Color A in any stitch with a standing bpsc, 1bpsc in each stitch around, join in first standing stitch with ss. [16 bpsc]
Round 3 Continue with the same color, ch3, 1dc in the same stitch, *ch3, skip next stitch, 2dc in next stitch; repeat from * to end omitting final 2 dc, join in top of beginning ch3 with ss. Fasten off. [16 dc, 8 ch3-sp]
Round 4 Work all stitches in this round in front of the stitches of Round 3. Join Color D in any skipped stitch of Round 2 with a standing popcorn, *ch4, popcorn in next skipped stitch of Round 2; repeat from * to end omitting final popcorn, join to first popcorn with ss. Fasten off. [8 popcorn, 8 ch4-sp]
Round 5 Work all hdc in front of the ch4-sps of Round 4 into the stitches of Round 3. Join Color A in the first stitch of any group of 2 dc of Round 3 with a standing hdc, 2hdc in the same stitch, *2hdc in next stitch, fphdc around next popcorn, 3hdc in next stitch; repeat from * to end omitting final 3 stitches, join to first standing stitch with ss. [40 hdc, 8 fphdc]
Round 6 Continue with the same color, ch3, 1dc in next 4 stitches, * 2dc in next fphdc, 1dc in next 5 stitches; repeat from * to end omitting final 5 stitches, close with invisible join. [56 dc]
At this point the mandala measures 7.5cm / 3inches in diameter. If your mandala is larger, replace the dc stitches of Round 6 by hdc.
Round 7 Join Color B in the second of any 2 dc worked in a fphdc with a standing bpsc, 1bpsc in each stitch around, join in first standing stitch with ss. [56 bpsc]
Round 8 Continue with the same color, ss to next stitch, ch3, *2dc in next stitch, ch2, skip next stitch, 1dc in next 3 stitches, ch2, skip next stitch, 1dc in next stitch; repeat from * to end omitting final stitch, join in top of beginning ch3 with ss. Fasten off. [48 dc, 16 ch2-sp]
Round 9 Work all stitches in this round in front of the stitches of Round 8. Join Color C in any skipped stitch of Round 7 with a standing popcorn, *ch5, popcorn in next skipped stitch of Round 7; repeat from * to end omitting final popcorn, join to first popcorn with ss. Fasten off. [16 popcorn, 16 ch5-sp]
Round 10 Work all hdc in front of the ch5-sps of Round 9 into stitches of Round 8. Join Color B in the first stitch of any group of 3 dc of Round 8 with standing hdc, *2hdc in next stitch, 1hdc in next stitch, fphdc around next popcorn, 1hdc in next stitch; repeat from * to end omitting final stitch, join in first standing stitch with ss. [64 hdc, 16 fphdc]
Round 11 Continue with the same color, ch3, 1dc in next 3 stitches, *2dc in next fphdc, 1dc in next 9 stitches; repeat from * to end omitting final 4 stitches, close with invisible join. [88 dc]
At this point the mandala measures 13cm / 5inches in diameter. If your mandala is larger, replace the dc stitches of Round 11 by hdc.
Round 12 Join Color D in second of any 2 dc worked in a fphdc with a standing bpsc, 1bpsc in each stitch around, join in first standing stitch with ss. [88 bpsc]
Round 13 Continue with the same color, ss to next stitch, ch3, *2dc in next st, 1dc in next 2 stitches, ch2, skip next stitch, 1dc in next 5 stitches, ch2, skip next stitch, 1dc in next stitch; repeat from * to end omitting final stitch, join in top of beginning ch3 with ss. Fasten off. [80 dc, 16 ch2-sp]
Round 14 Work all stitches in this round in front of the stitches of Round 13. Join Color A in any skipped stitch of Round 12 with a standing popcorn, *ch6, popcorn in next skipped stitch of Round 12; repeat from * to end omitting final popcorn, join to first popcorn with ss. Fasten off. [16 popcorn, 16 ch6-sp]
Round 15 Work all hdc in front of the ch6-sps of Round 14 into stitches of Round 13. Join Color D in first stitch of any group of 5 dc of Round 13 with a standing hdc, *1hdc in next stitch, 2hdc in next stitch, 1hdc in next 2 stitches, fphdc around next popcorn, 1hdc in next stitch; repeat from * to end omitting final stitch, join in first standing stitch with ss. [96 hdc, 16 fphdc]
Round 16 Continue with the same color, ch3, 1dc in next 5 stitches, *2dc in next fphdc, 1dc in next 13 stitches; repeat from * to end omitting final 6 stitches, close with invisible join. [120 dc]
At this point the mandala measures 18cm / 7inches in diameter. If your mandala is larger, replace the dc stitches of Round 16 by hdc.
Round 17 Join Color C in second of any 2 dc worked in a fphdc with a standing bpsc, 1bpsc in each stitch around, join in first standing stitch with ss. [120 bpsc]
Round 18 Continue with the same colors, ss to next stitch, ch3, 1dc in next 2 stitches, *ch2, skip next stitch, 2dc in next stitch, 1dc in next stitch, ch2, skip next stitch, 1dc in next 3 stitches, ch2, skip next stitch, 1dc in next 3 stitches, ch2, skip next stitch, 1dc in next 3 stitches; repeat from * to end omitting final 3 stitches, join in top of beginning ch3 with ss. Fasten off. [96 dc, 32 ch2-sp]
Round 19 Work all stitches in this round in front of the stitches of Round 18. Join Color B in any skipped stitch of Round 17 with a standing popcorn, *ch4, popcorn in next skipped stitch of Round 17; repeat from * to end omitting final popcorn, join in first standing stitch with ss. Fasten off. [32 popcorn, 32 ch4-sp]
Round 20 Work all hdc in front of the ch4-sps of Round 19 into stitches of Round 18. Join Color C in the first stitch of any group of 3 dc of Round 18 with a standing hdc, *2hdc in next stitch, 1hdc in next stitch, fphdc around popcorn, 1hdc in next stitch; repeat from * to end omitting final stitch, join in first standing stitch with ss. [128 hdc, 32 fphdc]
Round 21 Continue with the same color, ch3, 1dc in each stitch around, close with invisible join. [160 dc]
Round 22 Join Color A in any stitch with a standing bpsc, 1bpsc in each stitch around, join in first standing stitch with ss. [160 bpsc]
At this point the mandala measures 22.5cm / 8.5inches in diameter. If your mandala is larger, replace the dc stitches of Round 21 by hdc. Weave in all ends before attaching the mandala to the ring in Round 23.
Round 23 Continue with the same color, ch1, sc2tog over current stitch, next stitch and the mandala ring to end, close with invisible join. Weave in last end. [160 sc2tog]
Mini Bubbling Brook Mandala
The mini mandala is worked by repeating rounds 1 to 12 but using a different color placement. The mini mandala is joined to the 15cm / 6inch ring by repeating round 23 where the stitch count will be 88 sc2tog. The color placement for the mini mandala is as follows
| Round | Color | Round | Color |
|---|---|---|---|
| Round 1 | Color B | Round 7 | Color D |
| Round 2 | Color C | Round 8 | Color D |
| Round 3 | Color C | Round 9 | Color B |
| Round 4 | Color A | Round 10 | Color D |
| Round 5 | Color C | Round 11 | Color D |
| Round 6 | Color C | Round 12 | Color A |
| Round 23 | Color A |

Finishing
Work away all yarn tails. There is enough yarn left to make a third mandala. Place the colors based on the yarn amounts you have left.
Video tutorials
There is a left handed and right handed version available for my Bubbling Brook Mandala to help you every step of the way. Please note that the videos are in English US Terms. I hope the videos make it possible for everyone to make these mandalas.
Gauge
After Round 6, the mandala measures 7.5cm / 3 inches. With this gauge, the mandalas are approximately 10% smaller than the rings they go into. This means the mini mandala is 13cm before it goes into the 15cm ring, and the maxi mandala is 22cm before it goes into the 25cm ring. The 10% difference is important, because the mandalas need to be stretched when placed in the ring to ensure that they can support their own weight. If they are too large, they will be floppy and droopy when placed in the rings.
If you find that your mandalas are too big, you are most likely lifting your stitches higher than I am. I suggest you look at THIS VIDEO about the golden loop. If you are a so-called lifter, your stitches will be higher than average, and going down a hook size will not make any difference. I suggest that you try to pull your yarn back to make your stitches shorter.
In the pattern parts I also make suggestions for changes that you can make in the pattern to help you get your mandalas to the right size, both if they are larger than they should be and if they are smaller than they should be.


Support me and my work
There are many ways that you can support me and my work and most of them are free. By visiting my website you are already supporting me! Also by viewing any of the free videos on my YouTube channel you support me.
Other ways to support me are to make a purchase from one of my affiliates. I get a small commission based on your purchase after you click one of the links on my website. It costs you absolutely nothing but helps me a lot. My affiliates are Amazon.co.uk, KnitPicks, Wool Warehouse, Jimmy Beans Wool, Minerva Craft, The Knitting Network, Love Crafts, and Caro’s Atelier.
If you would like to support me in ways that are out of pocket for you, you could buy any of my patterns on Ravelry. You can also make a DONATION, which I really appreciate. Even a small amount helps me to keep my small business running.
With love,
Esther
This post contains affiliate links. Please read my disclosure and copyright policy. All opinions are my own and I only link to products I use or would use. Thank you for using the links on my blog and supporting my work.
Copyright (c) 2014-2026 It’s all in a Nutshell Creations. All rights reserved.
Discover more from It's all in a Nutshell Crochet
Subscribe to get the latest posts sent to your email.