
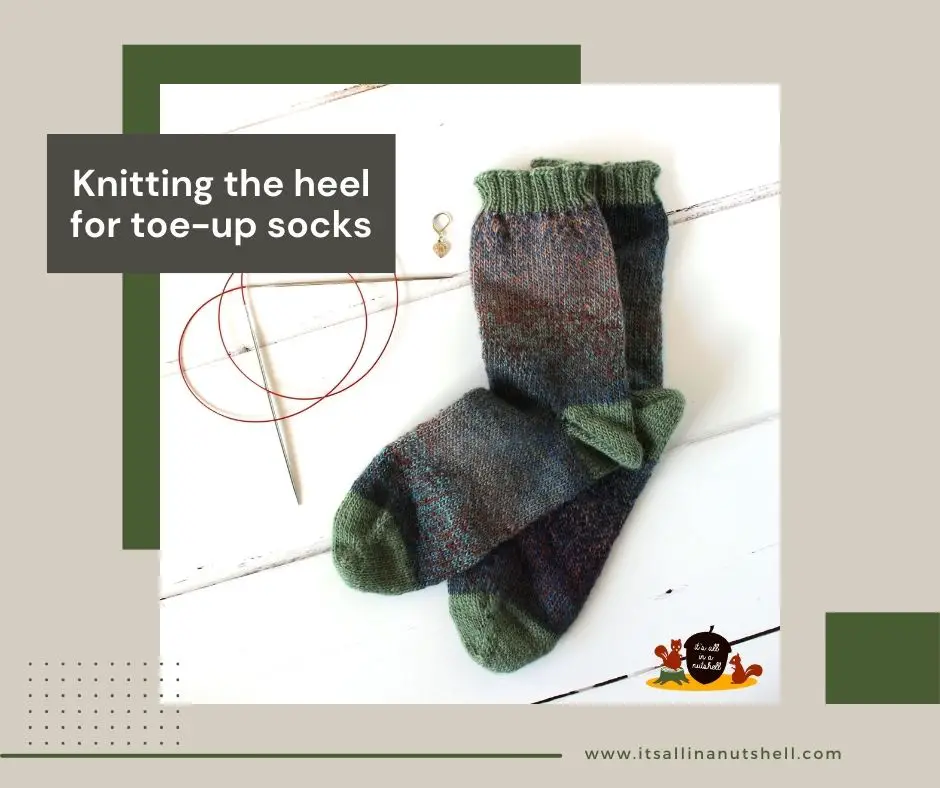
The heel is arguably the most difficult part of knitting a sock. It doesn’t matter if you knit toe-up or cuff-down; the heel is always there to break your flow. Personally I have come to enjoy the heel, (this was NOT the case first time knitting a heel), but now I really appreciate the magic of the process. In the video tutorial I show you how to make the heel, with all the details like the double stitches, increases and decreases. Let’s jump right in!
Resources
- “Happy Toe-up Socks” overview on It’s All in a Nutshell website
- “Happy Toe-up Socks” full written pattern PDF
- Sock yarn
Overview of materials needed for knitting socks
I use the following materials in the video tutorials
- Scheepjes Our Tribe Olive Wreath (879)
- Scheepjes Our Tribe Marie (962)
- 2.5mm circular needles with 70cm cable
- 2.5mm Double Pointed Needles (DPNs)
- stitch markers & darning needle
Scheepjes Our Tribe is available from Wool Warehouse (UK/Int), Love Crafts (USA), Caro’s Atelier (NL/EU) or your favorite Scheepjes Stockist.
Video Tutorial
In the heel video tutorial I show you how to work the double stitches that help with the decreases and increases that make up the short rows to form the sock heel. It sound complicated, but when you see me knitting the heel it might help a lot to clear up the confusion. When you have knitted the heel, you are past the most complicated part of the sock.
Forming the heel of the sock
In general, there are two methods for knitting heels; the short-row method and a heel flap with gusset. The short-row heel is a quick and neat option for toe-up socks and creates a rounded, cup-like heel that doesn’t involve picking up stitches. The heel flap and gusset method is more traditional and gives extra room at the heel, making it ideal for people with high arches or for a snug fit around the ankle. Personally, I like the simplicity of the short-row method, and is the one I use to knit socks.
Pattern
Abbreviations
k knit
p purl
st(s) stitch(es)
DPN(s) double pointed needle(s)
SM slip marker
PM place marker
RM remove marker
DSk double stitch knit. pick up right loop from the stich below and place it on left needle, knit though the loop you just picked up, slip knitted stitch back to left needle
DSp double stitch purl. slip stitch to right needle, pick up purl bar below the stitch and slip on left needle, purl through picked up bar, slip double stitch back to left needle
Instructions
Preparation The heel is worked on only half the stitches, specifically on the stitches on needle 1. Slip the stitches from needle 1 on a DPN. The stitches on needle 2 will not be used till we have completed the heel. You can leave the stitches on needle 2 on the cable, or use a stitch keeper to secure them.
Safety If you have never worked a heel before I suggest threading a lifeline through the stithes on needle 1 before starting on the heel. That way, if things go horribly wrong and you want to start again, you can easily return to the starting point without loosing any stitches.
Color Continue with the solid color yarn and the DPNs for the heel. Leave the color changing yarn attached to the stitches on needle 2, it will not be used till we have completed the heel.
Note that there are 3 instructions given in round brackets, these are for socks size (small, medium, large). Refer to the table HERE for details on which size you are making.
The heel is worked back and forth, so rows instead of rounds. The instructions given are worked only on the DPN. We first work a decrease section in which the number of stitches worked each row become less followed by an increase section in which the number of worked stitches increase.
DECREASE
Row 1 k till 2 sts left, DSk, turn.
Row 2 p till 2 sts left, DSp, turn.
Row 3 k till 1 st left before DS, DSk, turn.
Row 4 p till 1 st left before DS, DSp, turn.
Repeat Rows 3 and 4 (7, 8, 9) times till there are (8, 10, 12) regular sts between the DS, (9, 10, 11) DS either side of the DPN, and 1 unworked st at the two ends of the DPN.
Your heel is now a triangle and will look something like this.

INCREASE
Row 1 k to DS, PM, k all DS, DSk in last st, turn.
Row 2 p to marker, SM, p to DS, PM, p all DS, DSp in last st, turn.
Row 3 k to marker, SM, k to marker, RM, DSk next st, turn.
Row 4 p to marker, RM, DSp next st, turn.
Row 5 k to DS, k DS, DSk next st, turn.
Row 6 p to DS, p DS, DSp next st, turn.
Repeat Rows 5 and 6 (6, 7, 8) times till there are two DS either side of the DPN. Turn to have right side facing. Cut solid color yarn.
Finishing Slip two DS from right DPN to left DPN. Slip sts from DPN back on circular needle starting from the left side of the DPN. There are now still 4 DS on the circular needles, we will work those in the next part of the sock.
Gauge
The gauge for the socks given in this pattern is 5cm x 5cm equals 15 stitches x 19 rows in stockinet stitch.
A few notes when knitting the heel
At the start of the increase, pull your yarn tight when working Rows 1 and 2. This will help to prevent gaps in your sock. If you do happen to have a gap, use the yarn tails from the heel to close those gaps when you are working them away.
The tutorial here shows the heel working from the toe up, but if you are knitting socks from the cuff down you can still work the heel in the same way. The two sections of the sock are completely symmetrical.
Your sock at this point
After completing the heel your sock will look something like this.


Support me and my work
There are many ways that you can support me and my work and most of them are free. By visiting my website you are already supporting me! Also by viewing any of the free videos on my YouTube channel you support me.
Other ways to support me are to make a purchase from one of my affiliates. I get a small commission based on your purchase after you click one of the links on my website. It costs you absolutely nothing but helps me a lot. My affiliates are Amazon.co.uk, KnitPicks, Wool Warehouse, Jimmy Beans Wool, Minerva Craft, The Knitting Network, Love Crafts, and Caro’s Atelier.
If you would like to support me in ways that are out of pocket for you, you could buy any of my patterns on Ravelry or my SHOP. You can also make a DONATION, which I really appreciate. Even a small amount helps me to keep my small business running.
#itsallinanutshell
If you are making something with one of my patterns or one of my videos, I would love to see your work. Use the hashtag #itsallinanutshell on Instagram to help me find it, share your work in my It’s all in a Nutshell Crochet Nuts group on Facebook or tag me in one of your posts.
With love,
Esther
Follow me on
Facebook, YouTube, Ravelry, Instagram
This post contains affiliate links. Please read my disclosure and copyright policy. All opinions are my own and I only link to products I use or would use. Thank you for using the links on my blog and supporting my work.
Copyright (c) 2014-2025 It’s all in a Nutshell Creations. All rights reserved.
Discover more from It's all in a Nutshell Crochet
Subscribe to get the latest posts sent to your email.