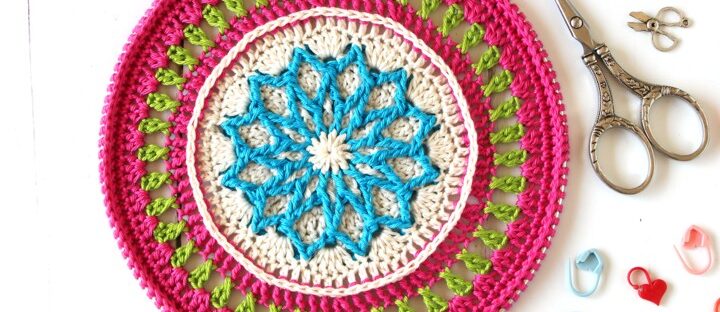
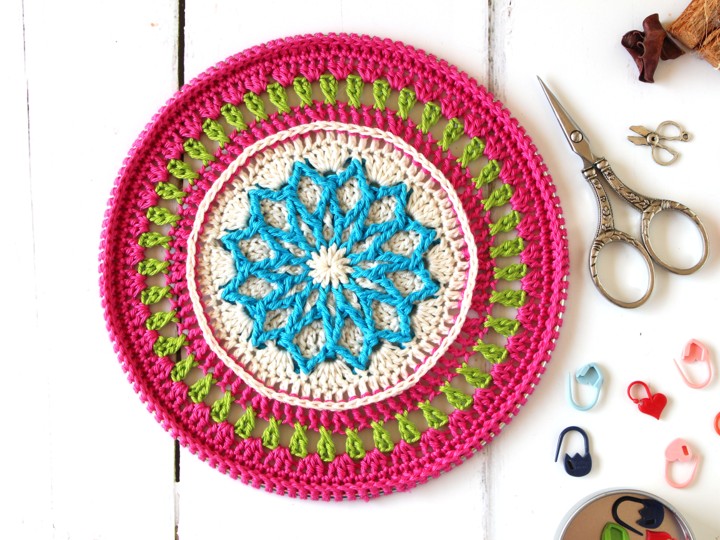
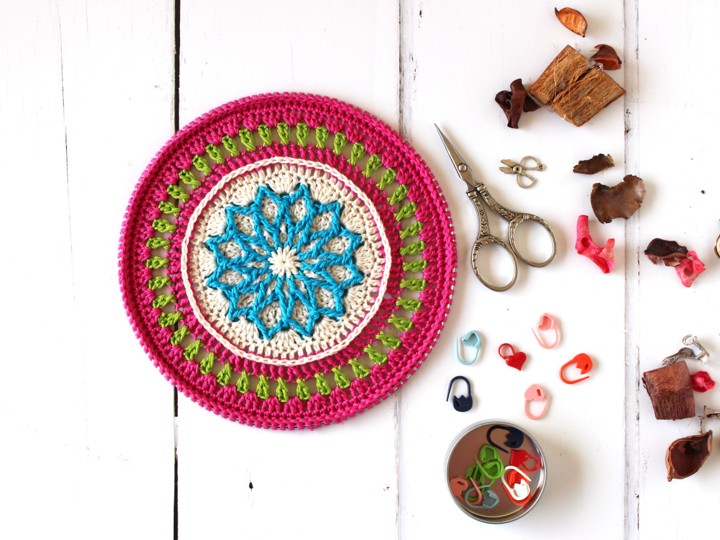
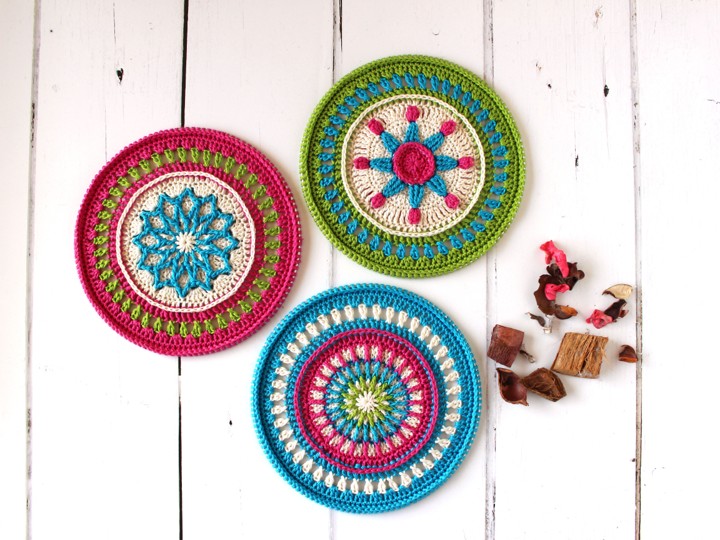
Here it is, the last of the 3 mandalas that make up the Starry Night Mandalas. My Milky Way Mandala has a diamond like star in the center and if you make many of them you really will have a milky way on your wall. In this post you find all the information you need to make your own Dark Star Mandala.
Dit patroon is beschikbaar in het Nederlands HIER.
Resources
- Starry Night Mandalas on Ravelry
- General information Starry Night Mandalas
- RIGHT HANDED Video tutorials in one YouTube playlist
- LEFT HANDED Video tutorials in one YouTube playlist
- 3.0mm hook
Materials
You will need 4 colors of a sport weight cotton yarn. The samples shown use Scheepjes Catona (50g/125m) yarn in the colors Color A – 130 Old Lace, Color B – 114 Shocking Pink, Color C – 146 Vivid Blue, Color D – 205 Kiwi Green. You will also need 3 x 20cm diameter mandala ring, a 3.0mm crochet hook and stitch markers.
Scheepjes Catona is available from Amazon.co.uk, Wool Warehouse (UK), Jimmy Beans Wool (USA), The Knitting Network (UK), Love Crafts (USA / UK), Caro’s Atelier (NL / EU), and many other Scheepjes stockists.
Abbreviations
This pattern uses US Crochet Terminology.
ch Chain
ch-sp(s) Chain space(s)
sc Single crochet
hdc Half double crochet
dc Double crochet
tr Treble crochet
fpsc Front post single crochet
bpsc Back post single crochet
bpdc Back post double crochet
fptr Front post double crochet
sc2tog work 2 sc sts together. Inset hook in indicated st and pull up a loop, insert hook in next st and pull up a loop, yarn over and pull through all loops on hook
fpdtr3tog work 3 fpdtr sts together. YO 3 times, insert hook around indicated post from front to back to front again, (YO and take off 2 loops on hook) 3 times, YO 3 times, insert hook around post of next st from front to back to front again, (YO and take off 2 loops on hook) 3 times, YO 3 times, insert hook around post of next st from front to back to front again, (YO and take off 2 loops on hook) 3 times, YO and pull through all 4 loops on hook
fptr2tog work 2 fptr sts together. YO 2 times, insert hook around indicated post from front to back to front again, (YO and take off 2 loops on hook) 2 times, YO 2 times, insert hook around post of next st from front to back to front again, (YO and take off 2 loops on hook) 2 times, YO and pull through all 3 loops on hook
Popcorn 5dc in indicated st, remove hook from working loop, insert hook in first st, pick up working loop, pull loop through first st, ch1
X-st skip next st, 1dc in next st, 1dc in skipped st covering first dc.
sl.st. Slip stitch
st(s) Stitch(es)
PM Place Maker
RM Remove Marker
YO yarn over
Milky Way Mandala Pattern
Round 1 With Color A, ch4 and close with sl.st. in first ch to form a ring. Ch3 (counts as 1dc), 11dc in ring. Close in beginning ch3 with sl.st.
[12 dc]
Round 2 Continue with the same color. Ch1 (does not count as a st), 2hdc in each st to end. Close in first st with sl.st. Fasten off.
[24 hdc]
Round 3 Attach Color C in any second hdc of a group of 2 hdc with a sl.st, ch1, *1sc in next 2 hdc, 1fptr around st from Round 1 directly below; repeat from * to end. Close in first sc with sl.st. Fasten off.
[24 sc, 1 fptr]
Round 4 With color A, work a standing sc in any fptr, 2sc in same fptr, 1fptr around hdc from Round 2 visible between two fptr, skip next 2 sc on Round 3, *3sc in next fptr, 1fptr around hdc from Round 2, skip next 2 sc on Round 3; repeat from * to end. Close in first standing sc with sl.st. The mandala is now 6cm in diameter.
[36 sc, 12 fptr]
Round 5 Continue with the same color, ch3 (counts as 1dc), 1dc in next st to end. Close in beginning ch3 with sl.st. Fasten off. The mandala is now 8cm in diameter.
[48 dc]
Round 6 With Color C, work a standing fptr2tog around any two adjacent fptr from Round 3, ch6, *1fptr2tog around the last fptr worked and the next fptr from Round 3, ch6; repeat from * to end. Close in first standing st with sl.st. Fasten off.
[12 fptr2tog, 12 ch6-sp]
Round 7 Work all st in the sts of Round 5 by working in front of the ch6-sps by keeping the ch-sps to the back of your work. With Color A, work a standing sc in any dc after a dc worked into a fptr from Round 4, 1sc in next 2 sts, ch2, skip next fptr2tog on Round 6 and next dc on Round 5, *1sc in next 3 sts, ch2, skip next fptr2tog on Round 6 and next dc on Round 5; repeat from * to end. Close in first standing sc with sl.st. Fasten off.
[36 sc, 12 ch2-sps]
Round 8 With Color C, work a standing fptr2tog around any two adjacent fptr2tog from Round 6, ch7, *1fptr2tog around the last fptr2tog worked and the next fptr2tog from Round 6, ch7; repeat from * to end. Close in first standing st with sl.st. Fasten off.
[12 fptr2tog, 12 ch7-sp]
Round 9 Work all in front of the ch7-sps by keeping the ch-sps to the back of your work. With Color A, work a standing dc in any ch2-sp of Round 7, 4dc in same ch2-sp, 1fpsc around next fptr2tog of Round 8, *5dc in next ch2-sp of Round 7, 1fpsc around next fptr2tog of Round 8; repeat from * to end. Close in first standing dc with sl.st.
[60 dc, 12 fpsc]
Round 10 Continue with the same color. Ch3 (counts as 1dc), 1dc in next st to end. Close with invisible join. The mandala is now 12cm in diameter.
[72 dc]
Round 11 With color B, work a standing bpdc around any st, 1bpdc around same st, 1bpdc around next 5 sts; *2bpdc around next st, 1bpdc around next 5 sts; repeat from * to end. Close in first standing bpdc with sl.st. Fasten off. The mandala is now 13cm in diameter.
[84 bpdc]
Round 12 With color D, work a standing dc in any st, 1dc in st before dc just worked, covering the dc and creating a X-st, ch1, X-st in next 2 sts, ch1; repeat from * to end. Close in first standing dc with sl.st. Fasten off. The mandala is now 15cm in diameter.
[42 X-st, 42 ch1-sp]
Round 13 With Color B, work a standing hdc in any ch-sp, 2hdc in same ch-sp, 3hdc in next ch-sp to end. Close in first standing hdc with sl.st.
[126 hdc]
Round 14 Continue with the same color. Ch1 (does not count as a st), 1sc in each st to end. The mandala is now 17cm in diameter.
[126 sc]
To attach any of the mandalas to the ring, first work away all yarn tails on the mandala. Then, attach the mandala to the ring using the same color as the last round worked.
Round 15 Continue with the same color, ch1 (does not count as a st), *sc2tog in the current stitch, the next stitch AND the ring, repeat from * to end. Close with an invisible join.
[126 sc2tog]
Video tutorial
There are left and right handed video tutorials available for my Super Nova Mandala. You can find them on my YouTube channel of linked here below.
Support me and my work
There are many ways that you can support me and my work and most of them are free. By visiting my website you are already supporting me! Also by viewing any of the free videos on my YouTube channel you support me.
Other ways to support me are to make a purchase from one of my affiliates. I get a small commission based on your purchase after you click one of the links on my website. It costs you absolutely nothing but helps me a lot. My affiliates are Amazon.co.uk, KnitPicks, Wool Warehouse, Jimmy Beans Wool, Minerva Craft, The Knitting Network, Love Crafts, and Caro’s Atelier.
If you would like to support me in ways that are out of pocket for you, you could buy any of my patterns on Ravelry or my SHOP. You can also make a DONATION, which I really appreciate. Even a small amount helps me to keep my small business running.
With love,
Esther
This post contains affiliate links. Please read my disclosure and copyright policy. All opinions are my own and I only link to products I use or would use. Thank you for using the links on my blog and supporting my work.
Copyright (c) 2014-2026 It’s all in a Nutshell Creations. All rights reserved.
Discover more from It's all in a Nutshell Crochet
Subscribe to get the latest posts sent to your email.