Yarn pooling is an interesting phenomenon which can be both a wonderful blessing and a massive bother, depending on what you are doing. With this post I am aiming to lift the fog around color pooling a bit.
Op verzoek heb ik deze uitleg ook in het Nederlands beschikbaar.
Huh? Color pooling? What’s color pooling?
If you have never worked with color changing yarn before you might not know what color pooling is. Color pooling occurs in a fabric worked with a color changing yarn when the same colors from different parts of the yarn line up over several rows or rounds of the pattern. Usually this is an unwanted phenomenon because most people use a color changing yarn to get random colors. But you can use this phenomenon to create some pretty awesome effects too.
How planned color pooling works
Color pooling is based on the principle that when a color changing yarn is manufactured it is done with a steady rhythm in the colorway. For example, the yarn will be repeating the colors red – grey – green – blue – orange. So when the strand comes to the end of the orange bit, it starts again with red and the sequence is again red – grey – green – blue – orange. The color cycle keeps on repeating and it is this repetition which we can use to our advantage.
To get planned color pooling to work you need to work in sync with the color rhythm of the yarn. This implies per definition that working in the color rhythm means that your rhythm will be unique because each one of us has a unique tension and way of working. But, before we get into dealing with personal differences, lets first look at how to apply color pooling.
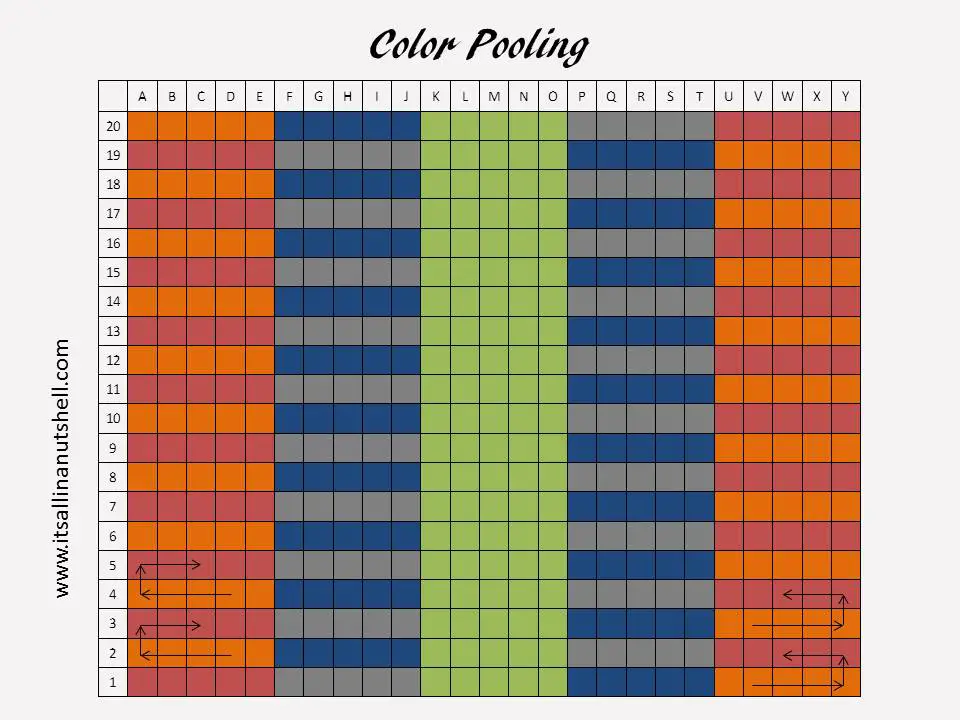
Take a look at the image below. Each square represents a stitch, this can be any stitch, a single crochet, a double crochet, or a group of stitches, doesn’t matter. But what is important is that the stitch is the same for each square. Now let us assume that we are using a color changing yarn that consists of 5 colors of an even length in the color sequence red – grey – green – blue – orange and let us assume that it takes 5 stitches to work each color. This means that if we start the first stitch of color 1 (stitch A1) after working 25 stitches we will be at the end of the sequence (stitch Y1).
For row 2 we turn our work and repeat row 1. This means that row 2 will be exactly the same as row 1, but in reverse order. To make it more easy to follow I have added arrows to the graph to indicate the working direction.
Row 3 is again a repetition of row 1 and 2, but now a bit of magic starts to happen in the colors. As you see in the graph, the colors for row 3 line up EXACTLY with the colors from row 1. It is this intentional alignment that we call planned color pooling. When you keep on working more rows according to the graph you will see that for every second row the colors align and this gives stripes over your work and you have created a planned color pooled fabric.
How argyle color pooling works
Now that you know how planned color pooling works, you can take it to the next level; argyle color pooling. In essence argyle color pooling is the same process, but now you are both aligning AND moving the color sequences to get the characteristic diamond shapes associated with argyle patterns. Please, don’t stress. It’s not as hard as it sounds. Let me take you through it step-by-step.
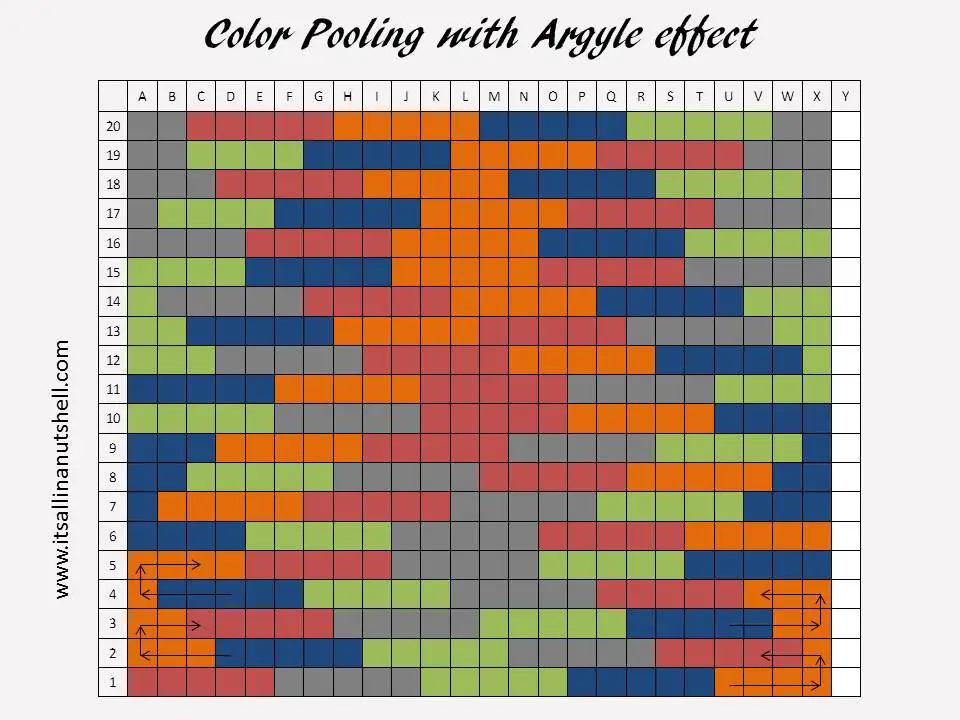
Assume we are using the same yarn as in the example above, so a color changing yarn with the sequence red – grey – green – blue – orange and we again work a row of stitches starting with the red and the last stitch is an orange stitch.
BEFORE continuing with row 2, remove stitch Y1 and then continue with row 2. This means that the new pattern will be one stitch shorter than the previous example, and it is the one stitch that causes the colorway to shift over. You will notice in the graph below that there are no stitches in column Y; this is the shift I am talking about.
Stitch Y1 is now worked at position X2, which means that all the consecutive stitches in row 2 have to move one position also. By the time you get to the end of row 2 and move to row 3, the shift becomes 2 stitches. This steady shift of 2 stitches per two rows causes the colors to move. In the middle of the fabric the colors will cross over and this can look a bit muddled, but the argyle diamond will be present moving outward and inward repetitively. In this pattern the blue diamond is the most pronounced.
Requirements for the yarn
In theory color pooling and argyle color pooling should work for any yarn that has a color change, but there are a few things that I have found work, and a few that don’t. I have tried 7 different yarns and investigated different methods looking for what does and does not work. My conclusions:
- The yarn must have clear and distinct color changes. This means that yarns that show a gradual color change will not work. You need that sudden change from one color to the next to be able to identify when you have completed a color sequence.
- There must be a steady rhythm to the color sequence. The amount of colors in the sequence is not important, it can be 3 colors or 10 colors, but they must be organised in the same repetitive way. So for example Color A, Color B, Color C repeated in a sequence will mean the yarn is A-B-C–A-B-C–A-B-C etc.
- I have found that the length of each color in the color sequence is not critical, but color pooling is easier if the color segments are shorter rather than longer. The longer a color segment is, the more important consistent tension becomes to obtain the planned color pooling effect. Color pooling is most easy if the color segments in a colorway are about 10 to 20cm each, but I have managed to get color pooling to work with color segments up to 2 meter. Tension is key here.
- If your total color sequence is over 20 meter, don’t try color pooling. Trust me on this.
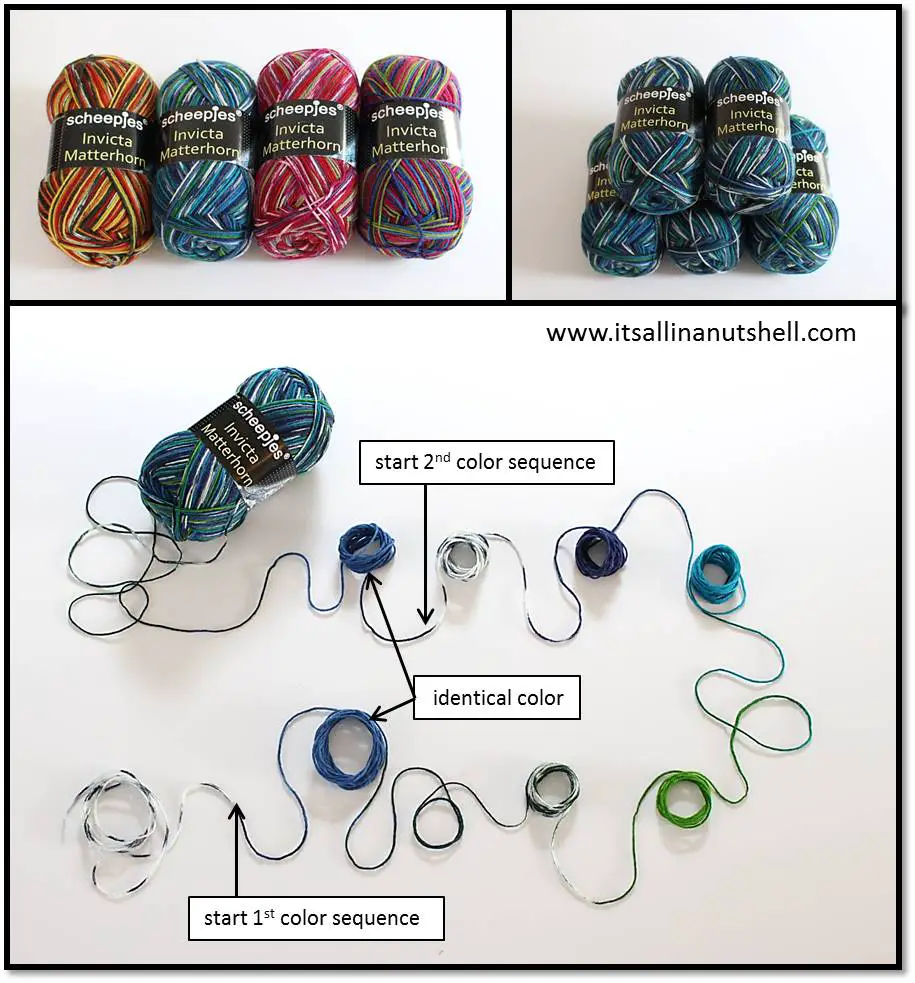
Here you see an example of the color sequence in a variegated yarn. This is Scheepjes Invicta Matterhorn showing the color rhythm. Scheepjes Matterhorn is now longer available, and has been replaced by Scheepjes Downtown, but the two yarns are very similar. As you can see some parts of the color sequence are long and others are short. This is not an issue at all. It will simply means that some of your stripes will be thicker than others.
Scheepjes Downtown is available from Caro’s Atelier (NL/EU), and many other Scheepjes stockists.
Requirements for your work
By far the most important requirement is consistency. Your tension needs to be as consistent as possible. The longer the color sequence, the more important tension becomes and the more prominent changes in tension are. In the worst case scenario your tension changes to such a degree that your stripes don’t shift evenly and you get jerking. This is what happened to me in my first attempt at color pooling. See how the stripes suddenly jump in the last 3 rows? I have indicated the most obvious point with arrows, but if you look more closely you will see that there are more places where the color pooling jumps. Sometimes this is due to my tension not being steady enough, but it can also be due to slight variations in the length of the color sequences in the yarn. The slight jump is almost inevitable and the longer the color sequences, the more pronounced a slight change in tension or color length will be. Personally I don’t mind, it gives my work a natural and playful look.
Another important requirement is that you ignore specific stitch counts given to you by well meaning others. The number of stitches you make per color sequence will depend on the yarn you use, the lot number of that yarn, the stitch you are making, the hook size you are using, your personal tension and maybe even your mood that day. So ignore all stitch advises such as start with 10dc, ch20, or whatever. The amount of stitches you need will be unique to you. The best thing you can do is adapt on the fly. I will explain this in a moment.
My method for Color Pooling
I have devised my own method for color pooling based on what I have noticed works for me. If this doesn’t work for you, no hard feelings. Adapt and change as you need it.
- Investigate your yarn and find the color sequence.
- Make a slip knot on your hook at the start of a color sequence. Choose a point that is easy to identify, e.g. the sudden change from pink to blue. Something that is impossible to miss.
- Work a row of foundation hdc stitches using 2 full color sequences. This row is not part of your pattern, consider it row 0 in the argyle graph above. Stop with the foundation stitches when you have the same color yarn on your hook as you started with in step 2.
- Turn and work your pattern row until you have the same color yarn on your hook as you started with in step 2. This is equivalent to row 1 in the argyle graph above.
- Undo 1 stitch. If you are working a group of stitches which you are repeating, undo one group of stitches.
- Turn and work your pattern till you get to the end of the row. This is row 2 in the argyle graph above.
- Turn and repeat working each row. After about 10 rows you will start to see a pattern emerge.
- KEEP YOUR TENSION STEADY!
- Attach new yarn at the correct point
- Continue till your project is the size you want it to be. Then tie off and work away your yarn tail.
- There will be foundation stitches left unworked. Cut the stitches off at about 10cm from your work. Undo the stitches till you get to the start of your fabric. Work away the starting yarn tail you just created.
Video
I have taken the liberty of also making a video showing how to work my method for color pooling. I have included this video in my series on Crochet Fundamentals. I hope this video can help to take away any final doubts or questions you may have.
Attach new yarn
Obviously, the chance that you will use more than one ball to make a project is rather high, so how to you cope with that? First of all, don’t stress and don’t panic. Follow these steps to get your yarn connection as smooth as possible
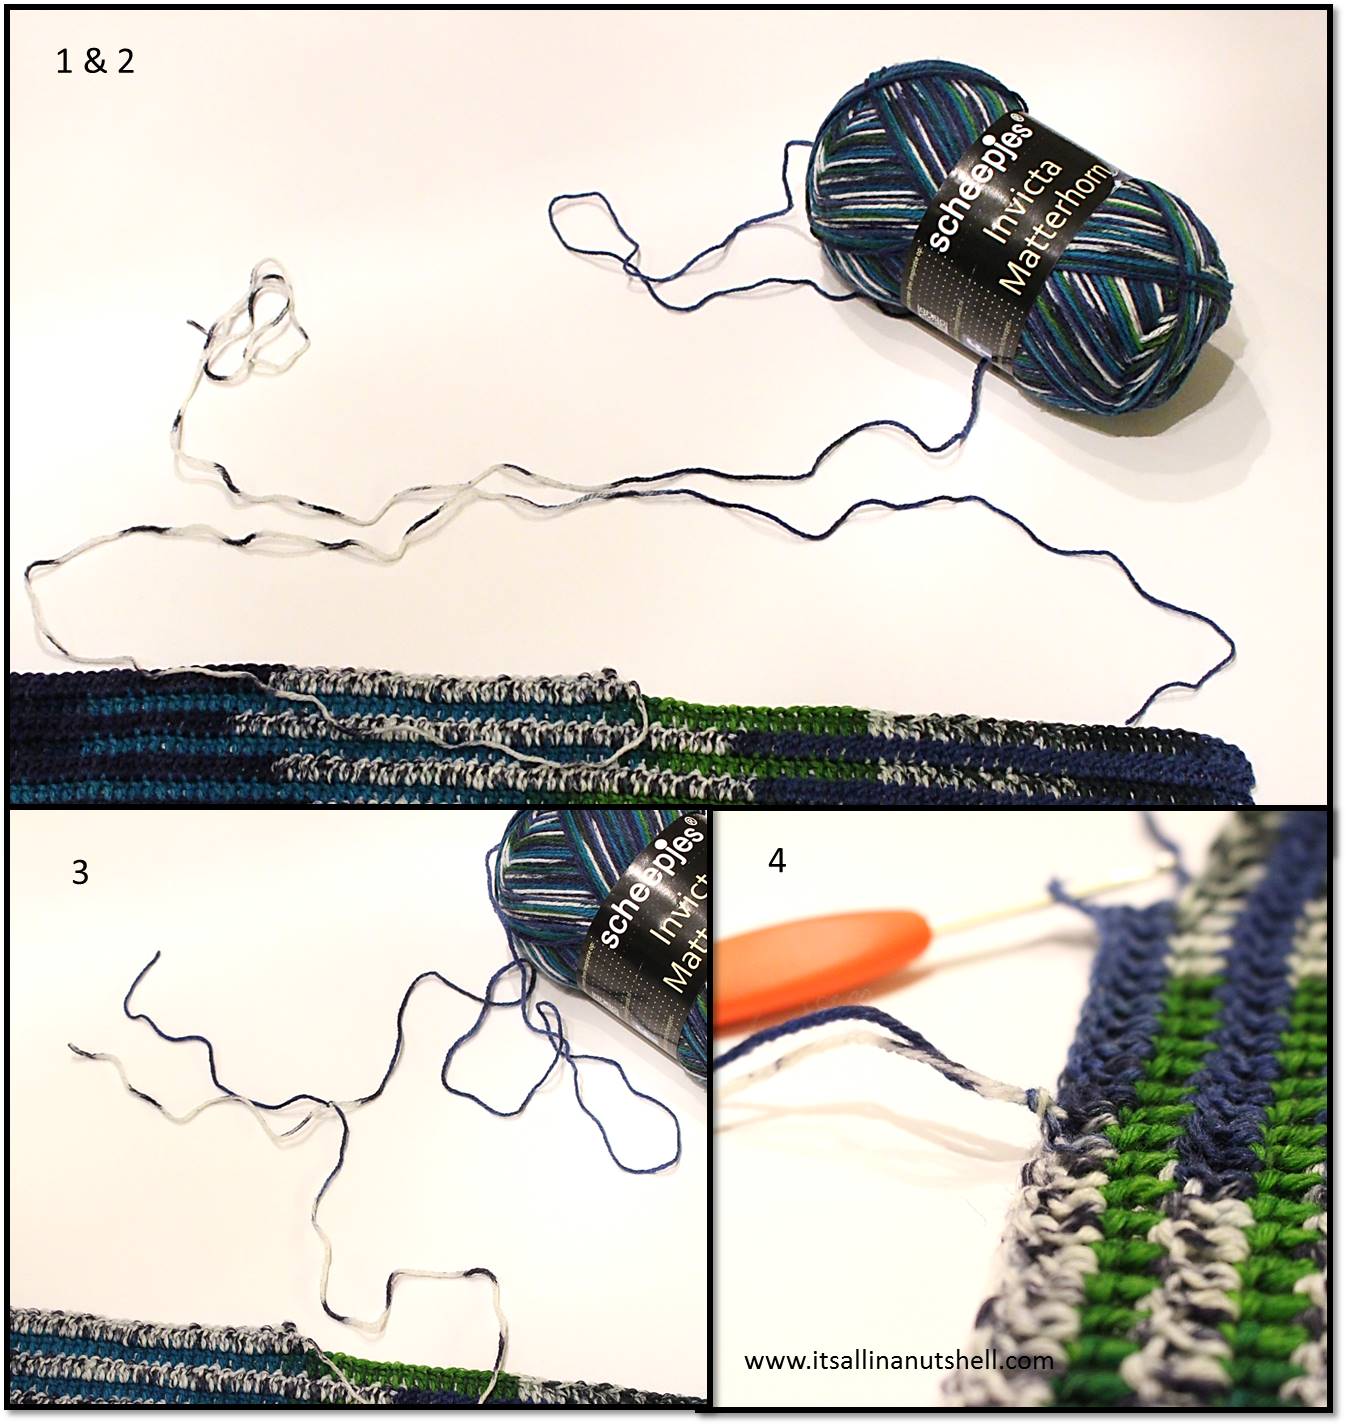
- Find the end point of the color sequence on the old ball. Cut your yarn about 20cm after the end of the color sequence.
- Find the starting point of the color sequence on the new ball. Cut your yarn about 20cm before the start of the color sequence.
- Knot the two yarns together at the point where the old ball’s color sequence ends and the new balls sequence starts. If you are really good at getting the joining position right you could use a Russian join, but if you are unsure, just knot the two together.
- Crochet over the knot and work a few stitches.
- Unpick the knot you just made and work away your yarn tails.
BIG NOTE: You must attach a new color sequence if you find a knot in your ball. I promise you that the pattern you are working will jerk if you just continue crocheting. Cut out the knot and attach the color sequence at the correct point.
My challenge: A Color Pooled blanket
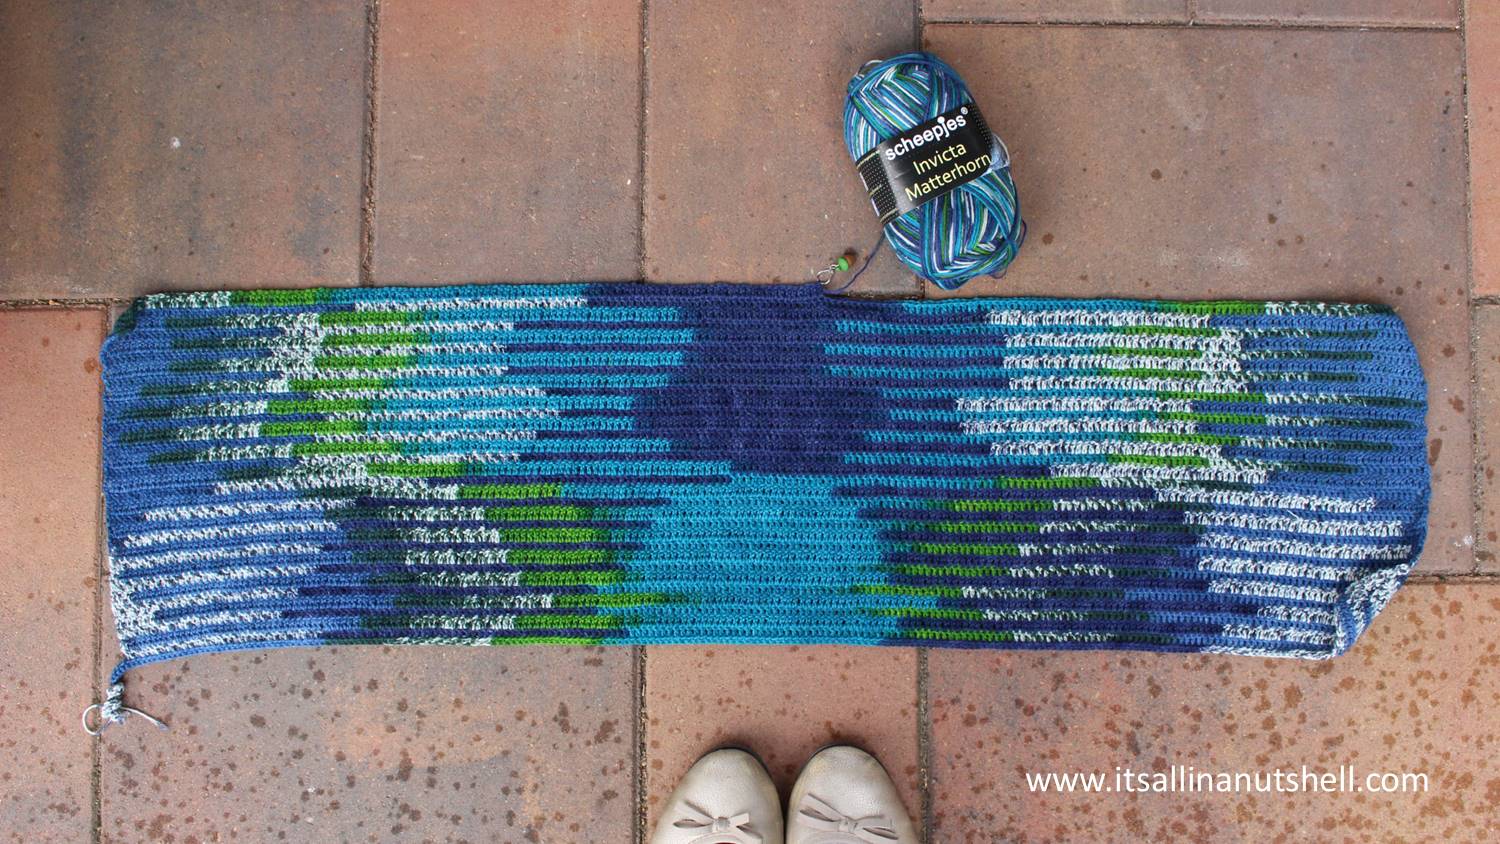
I have set myself the challenge to make a blanket using the color pooling method with Scheepjes Matterhorn. The Matterhorn has a relatively long color sequence, this means that my tension has to be steady. I have worked a set of foundation hdc, then a row of dc, pulled out 1 stitch, and then I continue to work dc’s for many more rows. I have made a small start and I am just loving the pattern that is emerging. This is super easy crochet; perfect for watching TV. I will keep you posted about my progress.
Support me and my work
There are many ways that you can support me and my work and most of them are free. By visiting my website you are already supporting me! Also by viewing any of the free videos on my YouTube channel you support me.
Other ways to support me are to make a purchase from one of my affiliates. I get a small commission based on your purchase after you click one of the links on my website. It costs you absolutely nothing but helps me a lot. My affiliates are Amazon.co.uk, KnitPicks, Wool Warehouse, Jimmy Beans Wool, Minerva Craft, The Knitting Network, Love Crafts, and Caro’s Atelier.
If you would like to support me in ways that are out of pocket for you, you could buy any of my patterns on Ravelry or my SHOP. You can also make a DONATION, which I really appreciate. Even a small amount helps me to keep my small business running.
#itsallinanutshell
If you are making something with one of my patterns or one of my videos, I would love to see your work. Use the hashtag #itsallinanutshell on Instagram to help me find it, share your work in my It’s all in a Nutshell Crochet Nuts group on Facebook or tag me in one of your posts.
With love,
Esther

Follow me on
Facebook, YouTube, Ravelry, Instagram
This post contains affiliate links. Please read my disclosure and copyright policy. All opinions are my own and I only link to products I use or would use. Thank you for using the links on my blog and supporting my work.
Copyright (c) 2014-2025 It’s all in a Nutshell Creations. All rights reserved.
Discover more from It's all in a Nutshell Crochet
Subscribe to get the latest posts sent to your email.




Wow, Esther, what a comprehensive blog post. I am impressed by your thorough coverage of this topic. Thank you for a great resource should I want to try this in future. Nicola
Thank you ?
Thanks for taking the time to explain and demystified this new technique for me! I have noticed its growing popularity in my facebook groups but it looks like a lot of complicated work.
It’s not as hard as it may look at first glance
Ill have to try it sometime. i can totally relate to how when you work with mulit color yarn, it repeats that color scheme which you kinda dont want. I am going through my stash trying to use up my yarn and i have a lot of camo yarn and I noticed how it repeats that pattern, just like how you wrote it!
Wow you explain it so well … I must try it soon. Is there any other yarn I can use besides red heart?
I used Scheepjes Invicta Matterhorn. I have given details on what the yarn caracteristics should be to help you identify which yarn could work
If it’s ok to ask. How did you do the chart? The planned pooling chart calculator does not work for me.
I’m working with Impeccable Luxury yarn and I added the colors and the number of stitches 3 light bluish, 6 blue, 4 light Purple and 6 Purple which includes the first chain. Any help would be appreciated if you have the time.
I did this chart by hand in Excel. the chart is just an indication of how the technique works and is not for a specific yarn.
Thanks for replying. I actually did that for my Antique yarn. I thought it was a different method.