
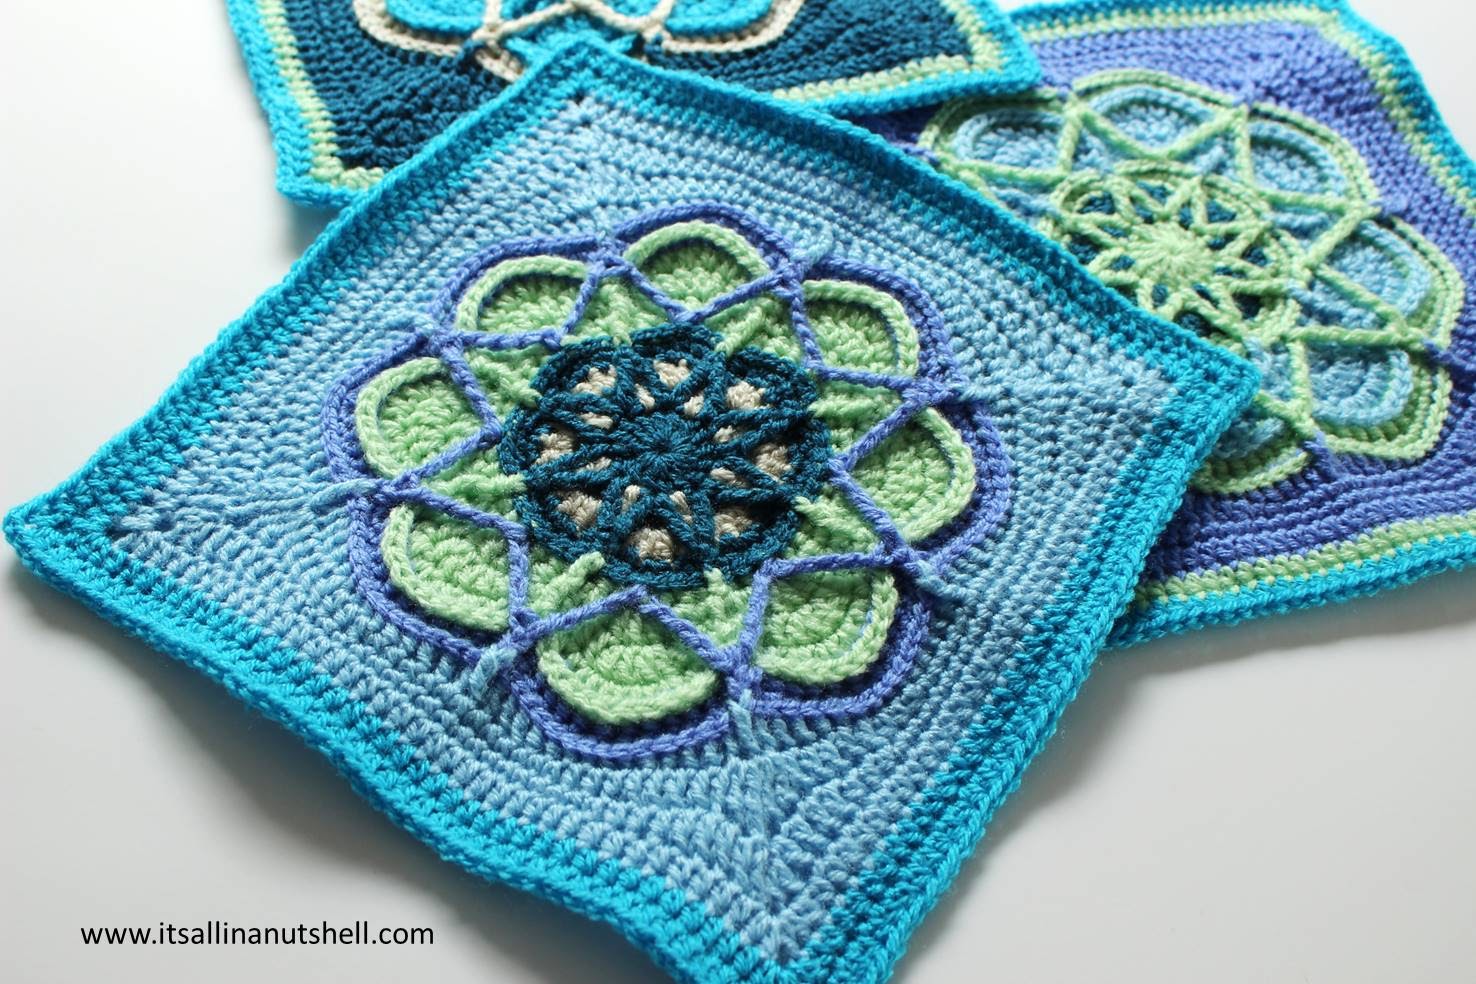
I have seen many lovely Esme squares that you all made for part 1 of Nuts about Squares. You should all be incredibly proud of your achievement! Today we continue with part 2 and I am sure that many of you know the contributing designer for this week. This week we are making Spiro Star designed by Helen Shrimpton from Crystals and Crochet.

Resources and Useful Links
- Add Nuts About Squares CAL on Ravelry
- Nuts about Squares CAL Information
- Written pattern Spiro Star in English (US Terms) on Ravelry*
- Written pattern Spiro Star in English (US Terms) on the designer’s blog*
- Written instructions for Nuts about Squares part 2 in this post
- *** RIGHT HANDED Video Tutorial *** for Spiro Star
- *** LEFT HANDED Video Tutorial *** for Spiro Star
- All RIGHT HANDED Nuts about Squares video tutorials in one YouTube playlist
- All LEFT HANDED Nuts about Squares video tutorials in one YouTube playlist
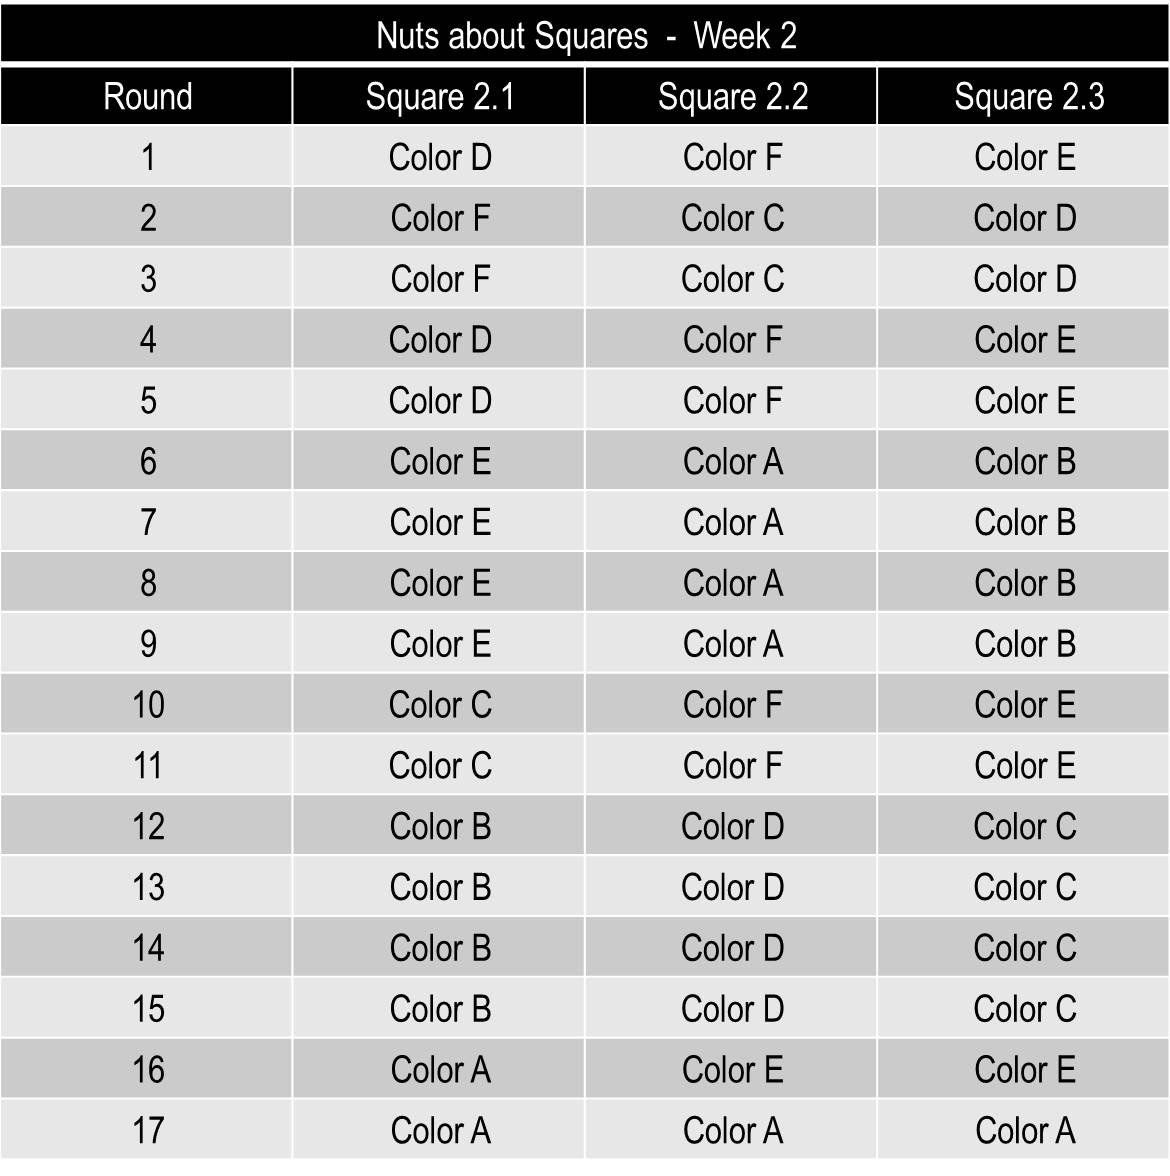
- Color chart Week 2 showing the color placement for all squares
The pattern is published on Ravelry. If you are not a member of this platform you can make a free account or download the pattern as a guest. Ravelry is a large platform with thousands of free, legal patterns.
*Important note: There is a small mismatch between the video and the written pattern on Round 16. This is because of an update in the pattern that was made after the video was recorded. My apologies for any confusion this may cause. You will be fine if you have 44 stitches at the end of the extra round added to the squares.
NEDERLANDS / Dutch
- Nederlands geschreven patroon voor Spiro Star op Ravelry*
- Nederlands geschreven patroon voor Spiro Star op de blog van de ontwerpster*
- Nederlandse geschreven instructies voor Nuts about Squares deel 2 in deze post
- Kleurkaart Week 2 met de kleurverdeling per toer
Het patroon staat op Ravelry. Als je nog geen lid bent van dit platform kun je een gratis account aanmaken of als gast een patroon downloaden. Ravelry is een groot platform met duizenden gratis patronen.
*Belangrijke opmerking: Er is een klein verschil tussen de Nederlandse en Engelse versies van dit patroon in Toer 16. Het is belangrijk dat je aan het eind van de extra Toer 17 44 steken hebt, dan komt alles goed. Mijn excuses voor enige verwarring dat zou kunnen ontstaan.
Yarn kits
The 3 colorways Nuts about the Earth, Nuts about the Sea, and Nuts about the Sky are available as kits. You can use one of the suggested kits/colorways, or you can use your own colors and yarn.
I have kits available for all three Nuts About Squares Colorways in my SHOP HERE. Choose between Nuts About Squares – EARTH in Scheepjes Stone Washed, Nuts About Squares – SEA in Scheepjes Colour Crafter, and Nuts About Squares – SKY in Scheepjes Sunkissed.
I have a detailed post with all the yarn information, amounts, weights and color combinations for the 3 colorways, you can find the yarn/color information HERE.
Color chart
The colors for each row are given in the Color Chart Week 2 for each of the three colorways or you can follow the general colorway in the table below.
Instructions Nuts about Squares week 2
Use the following hook sizes to make your squares or the hook size you need to get the correct size (this is the same hook size as last week):
- Color Crafter – 4.0mm (US G/6)
- Stone Washed – 3.5mm (US E/4)
- Sunkissed – 3.0mm (US D/3)
Work Rounds 1 to 16 according to the written pattern or video tutorial using the color chart for week 2. Use option 1 for Round 16. Work 3 squares in total.
If you used the written pattern you will have 40 stitches at the end of Round 16. Work an extra round to bring the final stitch count to 44 stitches per side. Round 17 using color A, attach yarn with a standing hdc or ch2 in any ch2-corner space, 1hdc in same space, ch2, and 2hdc in same corner space. This is your new corner made. *Work 1hdc on each of the next 40 st, (2hdc, ch2, 2hdc) in next ch2-space. Repeat from * 3 more times, omitting the last corner on the final repeat. Join to the first st with a ss. [44 hdc per side]
If you used the video instructions you will have 42 stitches at the end of Round 16. Work an extra round to bring the final stitch count to 44 stitches per side. Round 17 using color A, attach yarn with a standing hdc or ch2 in any ch2-corner space, ch2, and 1hdc in same corner space. This is your new corner made. *Work 1hdc on each of the next 42 st, (1hdc, ch2, 1hdc) in next ch2-space. Repeat from * 3 more times, omitting the last corner on the final repeat. Join to the first st with a ss. [44 hdc per side]
Repeat Round 17 for all 3 squares. Block your squares to the following sizes:
- Color Crafter – 25cm (10in)
- Stone Washed – 22cm (9in)
- Sunkissed – 20cm (7.5in)
Nederlandse Instructies (Dutch) voor Nuts about Squares week 2
Gebruik de volgende maat haaknaald om je vierkantjes te maken, of de maat haaknaald dat jij nodig hebt om de juiste maat vierkantje te krijgen (dit is dezelfde maat als vorige week):
- Color Crafter – 4.0mm
- Stone Washed – 3.5mm
- Sunkissed – 3.0mm
Werk Toer 1 tot 16 volgens het geschreven patroon van Spiro Star of gebruik de Engelstalige instructie video met de kleurverdeling zoals gegeven in de Kleurkaart voor Week 2. Gebruik optie 1 voor Toer 16. Maak in totaal 3 vierkantjes.
Als het goed is heb je 42 steken per kant aan het eind van Toer 16. (Als je iets anders hebt, pas dan deze laatste toer aan zodat je 44 steken hebt.) Werk nu een extra toer om je vierkantjes heen om tot 44 steken per kant te komen. Voor Toer 17 hecht kleur A aan met een staand hst of 2l in enige 2l-hoek, 2l, 1hst in dezelfde 2l-hoek. Dit is je nieuwe hoek. *Werk 1hst in ieder van de volgende 42 steken, (1hst, 2l, 1hst) in volgende 2l-ruimte. Herhaal vanaf * nog 3 keer waarbij je de hoek overslaat bij de laatste herhaling. Sluit met 1hv op de eerste steek en hecht af. [44 hst per kant]
Herhaal Toer 17 voor alle vierkantjes. Ik laat Toer 17 ook zien in deze Engelstalige instructievideo. Span je vierkantjes op op de volgende maaten:
- Color Crafter – 25cm
- Stone Washed – 22cm
- Sunkissed – 20cm
Video tutorials
If you appreciate a visual support to the pattern, you can follow the video for Spiro Star. This video shows you how to make the original square.
After you have completed the original pattern you need to add an extra round using Color A to bring your total stitch count to 44 stitches. I also show you how to do this in a short video.
Share your squares
When you have completed your 3 Spiro squares and have added the extra row you are finished for this week. At this point you will have 6 squares that look just amazing together. If you would like to share your work you can do so in the Official CCC Social Group on Facebook, share it on my Facebook page or tag me in your post on Instagram. If you use the hastag #NutsAboutSquares it will help me find it.

I hope to see all of you next week for part 3 of Nuts about Squares CAL when we make another beautiful square.
With love,
Esther
Follow me on
Facebook, YouTube, Ravelry, Instagram
This post contains affiliate links. Please read my disclosure and copyright policy. All opinions are my own and I only link to products I use or would use. Thank you for using the links on my blog and supporting my work.
Copyright (c) 2014-2024 It’s all in a Nutshell Creations. All rights reserved.
Discover more from It's all in a Nutshell Crochet
Subscribe to get the latest posts to your email.

This looks so difficult and it was so easy to do with the help of your instruction video. Kudos to you and the designer, Helen Shrimpton!! This is coming along brilliantly, what a wonderful CAL!
Een ddRstV is een driedubbel reliefstokje voor, ik dacht met 3 omslagen maar in de video worden 4 omslagen getoond. Is dat dan geen vdubbelRstV? ( vierdubbel)
Ik weet het niet zeker….een ddRstV is een dubbel dubbel stokje voorlangs. Dat is toch 4 keer? Dubbel is twee keer, dan is dubbel dubbel toch 4 Keer?
Inderdaad als je dubbel dubbel leest dan is het 4 keer.
Bedankt!
Hi Esther,
first of all I want to thank you for this beautiful CAL.
I’ve got a question….could you omit the word “color” in the above mentioned table, so that we can print it and write our own colors behind the letters A -F?
That would be super kind of you. But if it is too complicated for you, because all color tables are already done, that will be okay, too.
Thanks a lot.
Claudia
I have them done up to part 7 already. What I can do is make an extra page to the colorway pdf that you can print. Would that work for you?
You mean that you’ll do an extra page only with the letters A – F? Without any colornames? Only for me? That’s not necessary only for me. That will be too much work for you.
I can write my own colornames in very small letters between the columns of your table.
Only if there are more people who would like to have the table without the word “color” in each line and column you could think about it.
That would be really nice. But please, not only for me.
It’s not that much extra work. I can do that from week 3, and then come back soon for weeks 1 and 2. It is basically making a print-friendly page at the end of the document 🙂
Thank you 🙂
Thank you for the nice squares and the super video instructions. It is a cakewalk with your videos.
Thank you for the fantastic cal. Love all the squares so far. My second week squares have turned out a little smaller than week 1 squares. Will they make problems later on ?
You should block your squares, the will help them to become bigger. The squares from week 2 pul in on themselves
Thank you for your kind reply. They are on the blocking board now. Have a wonderful day and Easter and thanks again for the gorgeous cal.
Ik ontdekt nu pas de Cal dus te laat jammer?
Kan ik ergens e patronen van de grannies krijgen
Allemaal bij elkaar??? Ik bennaan het kijken welke cal ik zal nemen maar kan nu nog niet kiezen welke kleuren ze zijn alle 3 mooi zou ik ze ergens kunnen bekijken ik woon in Zaandam. Ik kan dan beter beslissen welke kleuren ik ga doen.
Ik hoop dat je mij kan helpen Esther alvast bvd
Marja
Het overzichtspagina is here: https://itsallinanutshell.com2017/02/25/nuts-about-squares-cal-2017/ Van hieruit kun je naar alle delen. Er is niet één pdf met alle patronen omdat alle patronen van een andere ontwerper zijn. Onder kopje Nederlands van iedere week tref je alle info in het Nederlands aan. Onthoud om ieder vierkantje een extra toer te geven om op 44 steken te komen. Ook dat staat in de beschrijving van iedere week.
I didn’t find the print friendly version button.
The print&pdf button is at the bottom of the post, before the comments
Do you have a PDF of your nuts about squares….ravlery keeps sending me back to your post.
Are the kits still available?
No, there is not one pdf available for NAS. The reason is that each square in the project is owned by a different designer. If you go to this post, it is the main post to link you to all the individual pattern parts.
https://itsallinanutshell.com2017/02/25/nuts-about-squares-cal-2017/
For week 1 for example, you make 3 squares designed by Dedri Uys, in week 2 you make 3 designed by Helen Shrimpton, etc. Follow the color chart given in the table for each week. If you have your own colors, label them A to F, and then follow the numbers on the chart per round. Do NOT follow the color placement of the designers, because that is to make a different version of the square.
You will have to collect all of the squares seperately from the linked pattern. Then add one or two rounds according to the instructions on my blog for that specific week so that each square has 44 hdc stitches.
In part 13 you join them and in part 14 you make a border.
Hope this helps 🙂
Esther